

Every ELISA kit ships with a manufacturer’s validation certificate, and none of it guarantees the assay will work in your hands. A laboratory must demonstrate its own precision, sensitivity, specificity, linearity, recovery and stability data in the actual sample matrix it uses, against acceptance criteria set before testing begins, and record every result in a validation report before the kit is trusted for reporting real results.
TL;DR:
- ELISA kit validation requires the laboratory to demonstrate assay performance in its specific sample matrix and operational conditions, not rely solely on manufacturer validation certificates.
- Full validation involves characterizing parameters such as precision, sensitivity, and linearity across multiple runs and replicates, especially for regulated or new applications, while partial validation suffices for minor changes in validated methods.
- Designing experiments with well-characterized calibrators, standardized sample handling, and operator qualification prevents technical errors from skewing validation results.
- Specificity, sensitivity, and recovery tests must use relevant analytes, interferents, and matrix-matched controls, with clear acceptance thresholds set before testing starts.
- Routine revalidation through internal quality control and external assessments helps maintain assay performance over time, while validation support services can help fill training and protocol gaps.
Table of Contents
- What does ELISA kit validation actually involve?
- How do you design experiments that measure the kit, not the operator?
- How do you test specificity, sensitivity, precision and recovery?
- How do you calculate acceptance criteria and write the report?
- What about plate uniformity, lot changes and method transfer?
- How do you maintain validated performance over time?
- How independent validation support fills the gaps
- Practitioner perspective: common pitfalls and expert shortcuts
- Get validated reagents and independent validation support
- Sources
- FAQ
What does ELISA kit validation actually involve?
Manufacturer validation does not transfer to your bench. It confirms the kit performs under the conditions the manufacturer tested. It says nothing about your operators, your plate reader, your pipettes, or the matrix you actually run. Analytical method validation has to be demonstrated by the laboratory performing routine analysis, not inherited from a certificate of analysis in the box.
That single fact is why ELISA kit validation exists as its own discipline, separate from kit selection. The scope of validation you need depends entirely on intended use, and getting that scope wrong wastes weeks either over-testing a screening assay or under-testing one that will end up supporting a regulated submission.
Full validation applies when you are running an in-house or heavily modified method, when the assay supports a regulated or clinical decision, or when you are validating a kit against a matrix the manufacturer never tested, such as saliva, cerebrospinal fluid, or a novel cell culture supernatant. A commercial kit used exactly as directed in its validated matrix can often justify a partial validation instead, one that confirms precision, sensitivity, and specificity without repeating every characterisation the manufacturer already performed.
Three tiers cover most real-world scenarios:
- Full validation – all core parameters characterised from scratch, appropriate for in-house assays, new intended uses, or regulated studies under EMA or FDA oversight
- Partial validation – confirms performance of a previously validated method after a defined change (new lot, new operator, new instrument, minor matrix shift), typically covering precision and accuracy rather than the full parameter set
- Mini-validation or bridging study – a short comparability exercise, often run over two to three days, confirming that a small change (reagent lot, plate reader, minor protocol edit) has not shifted results outside acceptance limits
Sample numbers scale with the tier. A full validation typically needs replicate testing across at least three independent runs, often five to ten replicates per level for precision work, and multiple concentration levels spanning the reportable range. A bridging study can sometimes be satisfied with a single day of side-by-side testing on the old and new condition, provided the comparison uses enough replicates to detect a meaningful shift statistically.
If your laboratory operates under ISO 15189, validation documentation is not optional. The standard requires objective evidence that an assay meets its performance specifications before clinical or diagnostic use, and assessors will ask for the underlying data, not just a summary statement. Laboratories supporting drug development or regulated bioanalysis should map their validation plan directly against the EMA bioanalytical method validation guideline, which sets explicit expectations for sensitivity, accuracy, and precision characterisation before an assay supports dosing or efficacy decisions.
Acceptance criteria should be written down before the first plate is run, not adjusted afterwards to fit whatever numbers come out. Decide your CV thresholds, your recovery window, and your minimum number of runs at the protocol stage. That single habit prevents the most common validation failure: results that look fine in isolation but were never measured against a predefined standard.
How do you design experiments that measure the kit, not the operator?
A validation plan is only as good as the experiment behind it. Sloppy sample handling or an uncalibrated pipette will produce a CV that looks like a kit failure when it is actually a technique failure, and that mistake wastes a validation cycle and misleads anyone reading the report afterwards.
Start with the materials, not the protocol:
- Establish a master calibrator strategy. Use a single, well-characterised calibrator lot across your validation runs wherever possible, rather than switching between kit lots mid-study. This isolates assay variability from calibrator drift.
- Build in-house quality control materials. Pool spare patient samples, cell culture supernatant, or spiked matrix at low, medium, and high concentrations, and bank enough volume to cover the entire validation and a good stretch of routine use afterwards.
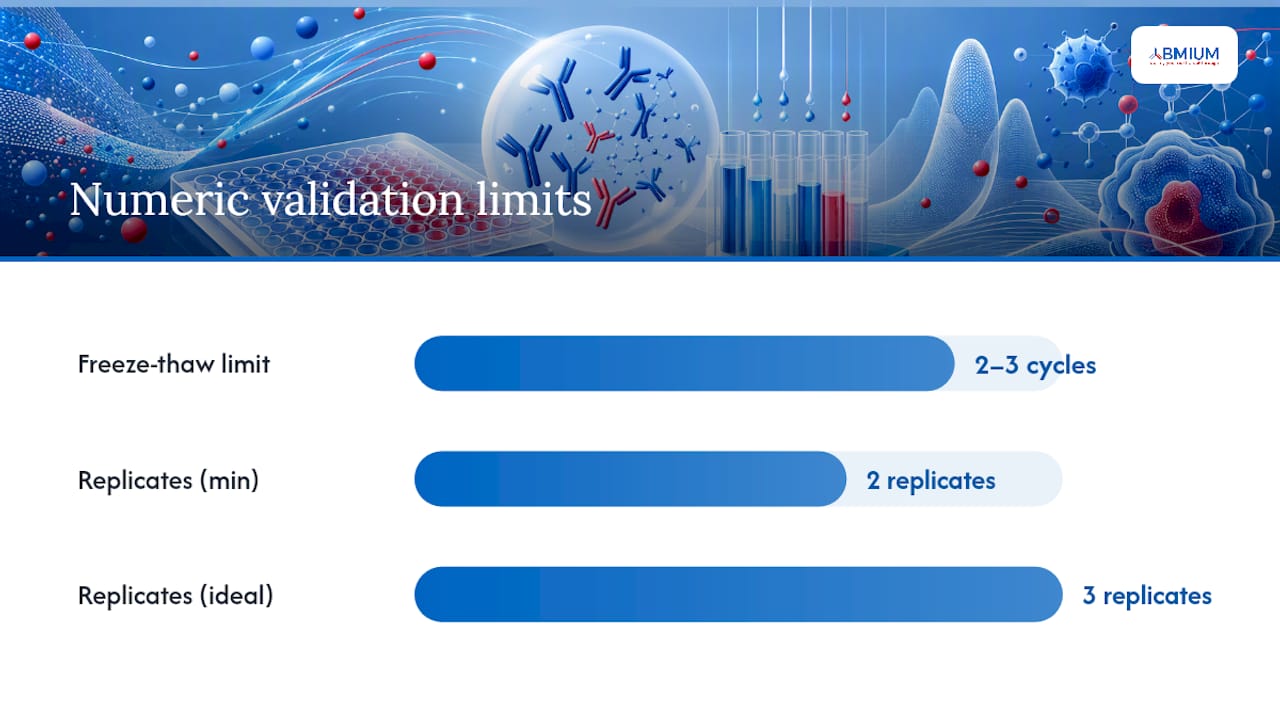
- Standardise sample handling before testing begins. Define collection tubes, centrifugation speed and duration, storage temperature, and a hard limit on freeze thaw cycles, typically no more than two or three for most protein analytes, and write it into the SOP.
- Design the plate layout deliberately. Randomise sample and control positions across the plate rather than running them in a fixed block, and include enough replicates per level (a minimum of duplicate, ideally triplicate, for precision work) to detect edge effects or reader drift.
- Train and verify every operator before they contribute validation data. Confirm pipette calibration against a certified reference, and observe at least one full run before accepting an operator’s data into the validation dataset.
Poor manual technique, uncalibrated pipettes, inadequate vortexing, and inconsistent plate handling are among the most common causes of inflated intra-assay CV, often outweighing the contribution of the kit itself. A validation exercise that skips operator qualification is measuring the wrong thing.
Pro Tip: Run your master calibrator and quality control materials on every plate throughout the validation study, not just the first one. A calibrator that drifts over three or four plates tells you more about long-term reproducibility than any single-day precision result ever will.
Matrix effects deserve separate attention here, because they rarely show up unless you look for them deliberately. Viscosity differences, haemolysis, lipaemia, and unexpected binding proteins in a non-standard matrix can all suppress or inflate signal without producing an obviously abnormal curve. Building a reproducible panel of matrix-matched controls, rather than relying on kit-supplied standards diluted in buffer, is the most reliable way to catch these interferences before they contaminate your validation dataset.
How do you test specificity, sensitivity, precision and recovery?
This is where validation stops being a checklist and becomes a set of real experiments with numbers attached. Each parameter has a defined design, a calculation, and an interpretation rule, and running them out of order or with too few replicates is the fastest way to produce a validation report nobody can defend under audit.
Specificity and cross-reactivity. Test the assay against structurally related analytes, common interfering substances, and, for immunoassays specifically, heterophilic antibodies and rheumatoid factor where the target population makes that plausible. Spike each potential interferent into your matrix at a clinically or biologically relevant concentration and compare recovery against a spike-free control. A specificity panel that only tests the target analyte in buffer tells you almost nothing about real samples.
Limit of detection and limit of quantification. Run your zero calibrator (or a blank matrix sample) in at least 10 to 20 replicates across multiple plates. Calculate the standard deviation of the blank response, then:
- LOD is typically the mean blank signal plus 2 to 3 standard deviations, converted to a concentration using the standard curve
- LOQ is the lowest concentration at which both accuracy (recovery within your defined window) and precision (CV within threshold) are met, usually confirmed empirically by testing low-concentration spiked samples rather than calculated purely from the blank
Intra-assay and inter-assay precision. Intra-assay CV comes from running the same sample multiple times (commonly five to twenty replicates) within a single plate and single run. Inter-assay CV comes from running that same sample across multiple plates, multiple days, and ideally multiple operators. Calculate both as:
CV (%) = (standard deviation ÷ mean) × 100
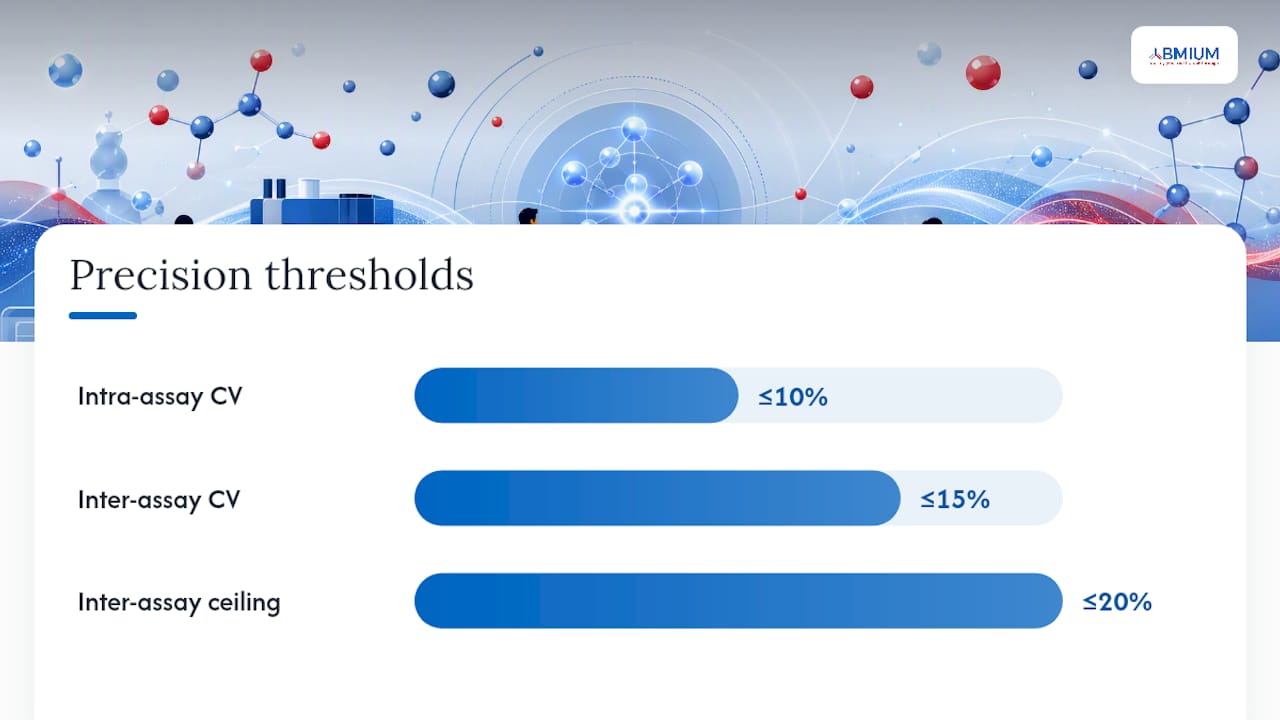
Typical validation benchmark: most immunoassay validation guidance sets intra-assay CV thresholds at 10% or below and inter-assay CV thresholds at 15% or below, with some laboratories applying a stricter 20% ceiling for inter-assay CV depending on analyte and matrix difficulty.
Linearity and parallelism. Serially dilute a high-concentration sample across the reportable range and plot observed versus expected concentration. A regression slope close to 1.0 and an R² above 0.98 to 0.99 is the usual pass mark. Parallelism testing, which confirms that diluted patient or biological samples behave the same way as the calibrator curve, matters especially for non-serum matrices where matrix composition can distort dilution behaviour in ways buffer-based calibrators never reveal.
Spike recovery. Add a known quantity of analyte to your matrix at low, medium, and high concentrations, then calculate:
Recovery (%) = (measured concentration ÷ expected concentration) × 100
Acceptable recovery windows commonly sit between 70% and 130%, though tighter windows (80 to 120%) are expected for regulated bioanalytical work under EMA guidance.
Robustness. Deliberately vary one parameter at a time, such as incubation time, incubation temperature, or wash cycle count, within realistic operational limits, and document whether results shift outside acceptance criteria. A robust assay tolerates small, plausible deviations in day-to-day handling without failing.
Each of these tests produces a number that either meets your predefined threshold or does not. There is no partial credit for “close enough” in a validation report, which is exactly why the thresholds need setting before the data exists.
How do you calculate acceptance criteria and write the report?
Once the experiments are run, the numbers need turning into a defensible decision, and that decision needs documenting in a format an auditor, a journal reviewer, or a regulator can follow without asking you to explain it verbally.
Work through the calculations in this order:
- CV for every precision level: (SD ÷ mean) × 100, calculated separately for intra-assay and inter-assay data
- LOD from blank replicate variability, LOQ from the lowest concentration meeting both accuracy and precision criteria
- Recovery at each spike level: (measured ÷ expected) × 100
- Linearity regression: slope, intercept, and R² from the dilution series
The table below sets out acceptance thresholds that reflect common practice across immunoassay validation guidance, though your own criteria should be fixed in your protocol before testing, and stricter for regulated or clinical decision-making assays.
| Parameter | Common acceptance threshold | Notes |
|---|---|---|
| Intra-assay CV | ≤10% | Calculated within a single plate and run |
| Inter-assay CV | ≤15% | Across multiple plates, days and operators |
| Spike recovery | 70–130% | Tighter 80–120% window often applied for regulated bioanalysis |
| Linearity (R²) | ≥0.98–0.99 | From serial dilution regression |
| LOQ precision | Within intra-assay CV threshold | Confirmed empirically, not purely calculated |
Any run that falls outside these thresholds needs a documented deviation, not a quiet re-run. Record what happened, the likely cause (reagent, operator, equipment, environmental), and the corrective action taken, whether that is retraining, recalibrating equipment, or repeating the run with a fresh reagent lot. A validation report with no deviations recorded across dozens of runs usually raises more suspicion during audit than one with a handful of well-documented and resolved exceptions.
A validation report or certificate of validation should, at minimum, include the assay name and kit lot, intended use and matrix, the validation tier applied, all raw and summary data for each parameter tested, the acceptance criteria used and whether each was met, any deviations and corrective actions, and a sign-off from the person responsible for the assay. A Practical Guide to Immunoassay Method Validation provides a usable template structure for this, built around exactly this set of fields, and it is worth adapting rather than building from a blank page. For statistical treatment of the resulting dataset, including how to handle outliers and borderline runs, Mayflower Bioscience’s guidance on assay data analysis is a useful practical reference.
What about plate uniformity, lot changes and method transfer?
Plate uniformity, lot comparability, and method transfer are the three checks labs most often skip once initial validation is done, and they are also the three most likely to quietly erode data quality over months of routine use.
- Plate uniformity studies confirm that signal is consistent across all wells, not just clustered ones. The Assay Guidance Manual recommends a three-day plate uniformity study for new assays, using replicate high and low controls distributed across the whole plate, with signal window or Z prime statistics used to confirm the assay discriminates reliably between positive and negative signal.
- Lot-to-lot comparability should be tested same-day wherever possible. Running old and new lots side by side on the same plate, same day, isolates lot variability from analyte stability drift or environmental changes that would otherwise confound the comparison. A simple paired comparison, or a regression of new lot values against old lot values, is usually sufficient to confirm equivalence.
- Method transfer between labs, instruments, or operators typically needs a shorter bridging study than a full validation. The Assay Guidance Manual describes a two-day study design as appropriate for transfers, compared with the three-day design for genuinely new assays, reflecting the lower risk profile of a transfer versus a first-time validation.
- Minor versus major changes determine the tier: a new reagent lot or a routine software update is usually minor and needs only a bridging comparison, while a new plate reader model, a change in incubation platform, or a shift to a different sample type is major and typically triggers a partial or full revalidation.
Treat revalidation as proportional to risk rather than automatic for every change. A tiered approach, minor changes get a bridging study, major changes get partial or full revalidation, keeps validation workload sustainable without letting real risk slip through unchecked.
How do you maintain validated performance over time?
Validation proves an assay works on the day you tested it. Keeping it working requires ongoing monitoring, because validation is not a one-time event and reagent lots, operators, and instruments all drift gradually enough that nobody notices without a system watching for it.
- Run internal quality control on every plate, using banked low, medium and high control materials, and set control limits (commonly ±2SD, with ±3SD flagged as an investigation trigger) before you start routine testing.
- Plot results on a control chart over time rather than reviewing each plate in isolation. A gradual upward or downward trend across ten or twenty runs is often more informative than any single out-of-range result.
- Participate in an external quality assessment scheme where one exists for your analyte. External quality assessment catches systematic errors that internal controls alone can miss, because it compares your results against other laboratories running the same or similar assays rather than only against your own history.
- Set clear revalidation triggers: reagent lot expiry, a new kit lot, any protocol edit, a new instrument or software version, and a scheduled periodic review even if nothing has obviously changed.
Pro Tip: Review your control chart trends monthly, not just when a single run fails. A slow drift that stays technically within acceptance limits for months is often the first sign of a reagent lot approaching the end of its stability window.
How independent validation support fills the gaps
Few laboratories have the bench time to run a full validation panel alongside a full research or diagnostic workload, and that gap is exactly where things get skipped: specificity panels get shortened, robustness testing gets dropped, and reports get written after the fact rather than planned before.
ABMIUM addresses that gap from two directions. Its catalogue is built around verified antibody sourcing and pre-purchase validation, so the reagent arriving at your bench already carries documented provenance rather than an unverifiable certificate of analysis. Where a lab needs more than a qualified reagent, ABMIUM’s independent validation services extend into SOP drafting, execution support, and statistical reporting, essentially the validation workload a stretched lab cannot absorb internally.
The decision between outsourcing and running validation in-house usually comes down to scale and regulatory stakes. A single research assay with low reporting stakes is often fine validated in-house with a partial validation plan. An assay supporting a regulated study, a clinical decision, or a new matrix your team has never characterised is where independent validation support earns its cost, catching gaps a busy lab might otherwise miss until an audit finds them first.
Practitioner perspective: common pitfalls and expert shortcuts
The single most expensive assumption in ELISA validation is treating the manufacturer’s certificate as a substitute for your own matrix. It is not. A kit validated in serum tells you almost nothing about how it will behave in cerebrospinal fluid or a lysate with unusual protein content, and labs that skip this step usually discover the problem months later, when results stop making biological sense.
If time is the constraint, prioritise ruthlessly: pipette calibration and plate layout discipline first, because they are cheap to fix and responsible for a disproportionate share of inflated CVs. Same-day lot comparisons come next, because they isolate the one variable most labs get wrong when comparing across days. A master calibrator strategy paired with a targeted bridging study, rather than a full revalidation, is usually the fastest legitimate route through a minor reagent change.
The one place I would not cut corners is high-throughput or automated workflow validation. Bring in a statistician before designing the study, not after the data is collected.
— Veron
Get validated reagents and independent validation support
Choosing kit components you can trust is the first half of validation, and it is where most delays actually start. Every reagent in the catalogue carries documented provenance and pre-purchase validation, so your team spends its bench time proving assay performance rather than chasing down whether a supplier’s antibody batch behaves the way its datasheet claims.

Beyond reagent sourcing, independent validation services can take on SOP drafting, plate uniformity studies, precision panels, and report assembly, work that fits neatly alongside the framework covered above when your own team is stretched too thin to run a full validation panel unassisted. Browse the ABMIUM catalogue to see how verified antibodies and ELISA kits are documented before purchase, or start with a specific reagent such as the Anti-Human CD276 antibody to see the provenance detail behind a single product page. If your next validation cycle needs support beyond what your bench can absorb, consider discussing an independent validation plan built around your assay’s intended use.
Sources
- A Practical Guide to Immunoassay Method Validation
- HTS Assay Validation - Assay Guidance Manual
- Guideline on bioanalytical method validation
FAQ
How is an ELISA method validated?
An ELISA method is validated by testing it against predefined acceptance criteria for precision, sensitivity, specificity, linearity, recovery, and stability in the actual sample matrix, then documenting every result in a validation report.
What is the protocol for validating an ELISA kit?
The protocol typically involves defining intended use and validation tier, preparing calibrators and quality control materials, running specificity, precision, linearity, and recovery experiments across multiple plates and days, then comparing results against fixed acceptance thresholds before assembling a validation report.
What are the core steps of ELISA method validation?
Core steps generally cover specificity and cross-reactivity testing, determination of the limit of detection and limit of quantification, intra-assay and inter-assay precision, linearity and parallelism, spike recovery, and robustness testing under small deliberate protocol changes.
Are ELISA tests reliable?
ELISA tests are reliable when properly validated for the specific matrix and intended use, with documented precision, typically an intra-assay CV of 10% or below, and ongoing internal quality control; without lab-specific validation, reliability cannot be assumed from the manufacturer’s data alone.
Do commercial ELISA kits still need independent validation?
Yes. Manufacturer validation reflects the conditions the manufacturer tested, not your operators, instruments, or matrix, so a partial validation confirming precision, sensitivity, and specificity in your own hands is still required before results can be trusted.