

The accepted framework for antibody validation is the IWGAV five pillars: genetic strategies, orthogonal strategies, independent antibody strategies, tagged protein expression, and immunocapture followed by mass spectrometry. No single pillar suffices on its own, and validation must be repeated for each application rather than assumed to transfer across assays. Where feasible, prioritise genetic knockout controls and orthogonal mass spectrometry; they give the strongest direct evidence of specificity.
TL;DR:
- Genetic knockout validation is the most definitive method but is limited by the availability of viable knockout lines and potential off-target effects.
- Orthogonal validation correlates antibody signals with independent measurements like mass spectrometry, but it cannot fully confirm specificity, especially for co-migrating proteins.
- Comparing two or more antibodies against non-overlapping epitopes provides supportive evidence when results are concordant; discordance suggests off-target binding or epitope issues.
- Validation must be tailored to the specific application, with different criteria for western blot, immunohistochemistry, immunoprecipitation, ELISA, and flow cytometry to avoid false positives or negatives.
- Relying solely on vendor datasheets or one application’s validation for broader use is a common pitfall; multi-pillar validation and community resources improve reproducibility.
Table of Contents
- Antibody validation methods: the five pillars and when to use each
- Genetic strategies: designing and interpreting knockout validation
- Orthogonal validation using proteomics and transcriptomics data
- Independent antibody comparisons and proximity assays
- Tagged expression and rescue experiments in practice
- Immunocapture and mass spectrometry: running and reading IP-MS
- Application-specific validation: WB, IHC/IF, IP, ELISA and flow cytometry
- A practical checklist before you trust an antibody
- Community protocols and open validation datasets
- Common pitfalls that undermine reproducibility
- Quantitative approaches to affinity and specificity
- Validating performance across fixation methods and species
- Assessing lot-to-lot consistency
- Troubleshooting ambiguous validation data
- Regulatory context and standards for antibody validation
- What actually separates rigorous labs from the rest
- ABMIUM MATCH and independent validation support
- Sources
- FAQ
Antibody validation methods: the five pillars and when to use each
Antibody validation methods fall into five categories, each answering a slightly different question about whether an antibody binds what it claims to bind. Understanding what each pillar actually proves, rather than treating them as interchangeable checkboxes, is what separates a rigorous validation plan from a box-ticking exercise.
Genetic strategies remove or reduce the target gene (CRISPR knockout or RNA interference knockdown) and check whether antibody signal disappears accordingly. This is the closest thing to a gold standard, because it tests the antibody against a biological negative control rather than a synthetic one. Its limitation is practical: not every target is amenable to knockout, and some genes are essential, meaning a full knockout line is not viable.
Orthogonal strategies correlate antibody-based signal with an antibody-independent measurement, typically targeted mass spectrometry or public proteomics datasets. This works well for expression-level correlation across many samples but says less about whether a specific band or stain pattern is genuinely the target protein rather than a co-migrating contaminant.
Independent antibody strategies compare two or more antibodies raised against non-overlapping epitopes of the same target. Concordant results across independent reagents build confidence; discordant results usually point to at least one antibody having off-target binding.
Tagged protein expression uses a genetically encoded tag (FLAG, HA, GFP) fused to the target, then compares anti-tag detection with anti-target antibody detection in the same sample. It is useful when no knockout line exists, but overexpression can introduce its own artefacts.
Immunocapture followed by mass spectrometry (IP-MS) pulls down the antigen with the antibody and identifies what actually co-purified, giving direct peptide-level evidence of what the antibody binds.
In practice, most labs combine two or three pillars rather than attempting all five for every target:
- Use genetic knockout as the primary check whenever the cell line and gene allow it.
- Add orthogonal MS or proteomics correlation when a KO line is not feasible or as a secondary confirmation.
- Reserve IP-MS for antibodies destined for high-stakes work such as immunoprecipitation-based discovery or clinical translation research.
- Deploy independent antibody comparison as a lower-cost triage step before committing resources to a full validation programme.
Large-scale validation efforts illustrate how this combination approach scales: studies referencing the Human Protein Atlas have validated thousands of antibodies, with over 6,000 tested and 1,630 confirmed by at least two independent pillars. That ratio is a useful reality check. Even in a well-resourced, systematic programme, most antibodies still require more than one line of evidence before anyone trusts the result.
Genetic strategies: designing and interpreting knockout validation
Genetic validation is the pillar most researchers reach for first, and for good reason. It tests specificity against a true biological null rather than an assumed one. But a poorly designed knockout experiment can be worse than no genetic validation at all, because it creates false confidence.
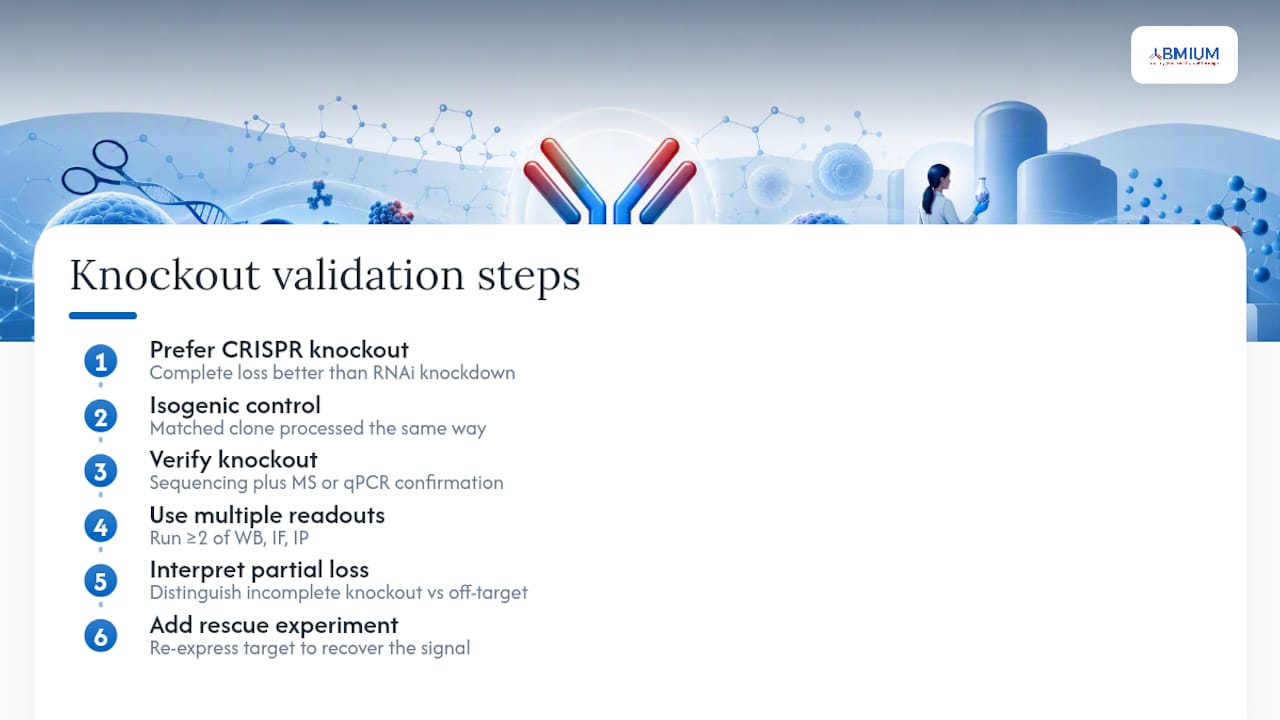
1. Choose CRISPR knockout over RNAi knockdown where the target allows it. Knockdown rarely achieves complete protein loss, and residual expression can mask off-target antibody binding that would otherwise be obvious. CRISPR-generated knockout lines give a cleaner negative control, which is why experienced validation groups consistently favour them for rigorous specificity assessment.
2. Select an appropriate cell line and generate a matched isogenic control. The knockout and parental lines should differ only at the targeted locus. Clonal selection introduces genetic drift, so pick a control clone that went through the same single-cell cloning process rather than comparing to unedited bulk cells.
3. Verify the knockout before trusting any antibody data generated from it. Sequencing confirms genotype but not protein loss, particularly where alternative splicing or truncated protein products persist. Run parallel confirmation with targeted mass spectrometry or quantitative PCR, and only then interpret the antibody’s western blot or immunofluorescence signal against that verified background.
4. Choose readouts deliberately. Western blot shows whether the expected molecular weight band disappears in the knockout. Immunofluorescence shows whether the staining pattern vanishes at the expected subcellular location. Immunoprecipitation confirms whether pulldown yield drops accordingly. Run at least two of these three readouts; a single method can mislead if the antibody has an off-target signal that happens to sit at a similar molecular weight.
5. Interpret partial versus complete signal loss correctly. Complete loss in a verified knockout is strong evidence of specificity. Partial loss usually means either incomplete knockout (check protein depletion again) or a genuine off-target interaction contributing residual signal. Do not average these two explanations away; investigate which one applies.
6. Add a rescue experiment where resources allow. Re-expressing the target in the knockout background and recovering the original signal is one of the more persuasive controls available, because it rules out clonal artefacts unrelated to the gene itself.
Plan for realistic timelines. Generating and verifying a CRISPR knockout line, then running the full antibody characterisation across two or three assays, typically takes a mid-level graduate student working part-time about a month when following a consensus knockout protocol. Budget accordingly rather than treating genetic validation as a quick add-on step.
Pro Tip: If a knockout line already exists in your institution or a collaborator’s freezer for your target, use it before generating a new one. Duplicated knockout lines are one of the most common and avoidable inefficiencies in antibody validation work.
Orthogonal validation using proteomics and transcriptomics data
Orthogonal validation asks a different question than genetic knockout: does antibody signal track with an independent, antibody-free measurement of the same protein across many samples? Targeted mass spectrometry and public proteomics datasets are the two most practical sources of that independent signal.
The method works by correlating antibody-based readouts, such as western blot band intensity or immunohistochemistry staining scores, against MS-quantified protein abundance across a panel of cell lines or tissues with naturally varying expression levels. Strong correlation across that panel supports specificity; a flat or inconsistent relationship suggests the antibody signal is not tracking the target protein reliably.
Getting a trustworthy correlation depends on a few design choices:
- Select a sample panel with genuinely variable target expression, not a narrow range where any antibody would appear to correlate by chance.
- Include enough samples to support a statistically meaningful correlation rather than relying on three or four data points.
- Match the dynamic range of the antibody assay to the expected abundance range in the panel, since antibodies saturate at high concentrations and lose sensitivity at low ones.
- Where possible use the same lysates or tissue sections for both antibody and MS measurements to avoid confounding from sample-to-sample variability.
This is a genuinely useful pillar, and IWGAV follow-up work has demonstrated strong correlation between antibody signal and MS-measured abundance across multiple cell lines when the panel is designed carefully. It is not, however, a substitute for genetic controls when they are available, because correlation across samples does not rule out a consistent off-target interaction that happens to scale with the true target’s expression.
Transcript-level data (RNA-seq, qPCR) deserves a specific caveat. Messenger RNA abundance is often a poor proxy for protein abundance, particularly for proteins with post-transcriptional regulation, short or long half-lives, or tissue-specific translational control. Treat RNA expression data as supportive context when planning which samples to include in an orthogonal panel, not as validation evidence in its own right. If antibody signal and transcript levels disagree, that disagreement alone tells you nothing definitive about specificity; it might reflect real post-transcriptional biology rather than antibody failure.
Orthogonal validation is best positioned as a scalable, sample-based complement to genetic strategies, not a replacement. Use it where a knockout is unavailable, or as a second line of evidence to reinforce a knockout result across a broader biological range than a single cell line can offer.
Independent antibody comparisons and proximity assays
Comparing two or more antibodies raised against different, non-overlapping epitopes of the same target is one of the more accessible antibody validation methods available, requiring no genetic engineering and relatively modest reagent cost.
The logic is straightforward: if two antibodies recognising different epitopes on the same protein produce concordant results (same band, same staining pattern, same subcellular localisation), it is unlikely both happen to share the same off-target cross-reactivity by coincidence. Discordant results are informative in a different way. If both antibodies show an identical unexpected band or an identical off-target staining pattern, that similarity often points to a shared crossreactive epitope rather than confirming specificity, according to independent antibody strategy literature.
A practical selection and interpretation approach looks like this:
- Choose antibodies raised in different host species or against distinct immunogen sequences to maximise epitope independence.
- Compare results within the same application first (two antibodies both tested by western blot) before cross-comparing across applications.
- Treat full concordance across localisation, molecular weight, and relative intensity as reasonably strong support for specificity.
- Treat partial concordance (correct band, wrong relative intensity across samples) as a signal to investigate lot variation or epitope accessibility rather than an automatic pass or fail.
- Escalate to a third pillar, such as orthogonal MS, when two independent antibodies disagree outright.
Proximity ligation assay (PLA) and proximity extension assay (PEA) sit adjacent to this pillar and add value in specific circumstances rather than as a routine first step. PLA uses paired antibodies against two different proteins (or two epitopes of one protein) conjugated to DNA probes that amplify a signal only when the probes are in close proximity, offering single-molecule resolution of protein interactions or modifications in situ. PEA applies similar proximity logic to multiplexed protein quantification in solution. Both are worth deploying when standard immunofluorescence lacks the resolution to confirm a specific interaction, or when a research question depends on detecting a genuine protein-protein interaction rather than co-localisation within a diffraction-limited spot. They are not a substitute for genetic or orthogonal validation of the individual antibodies used; a proximity assay built on two poorly validated antibodies simply compounds the uncertainty.
Tagged expression and rescue experiments in practice
Tagged protein expression earns its place among the IWGAV pillars because it works when no knockout line exists and the target is difficult to silence by RNA interference. The core comparison is simple: express a tagged version of the target (FLAG, HA, Myc, GFP) and compare the pattern detected by an anti-tag antibody against the pattern detected by the antibody under validation.
Endogenous CRISPR knock-in tagging, where the tag is inserted at the native genomic locus, is preferable to plasmid-based overexpression whenever the editing is feasible. Overexpression drives protein levels well beyond physiological range, which can produce mislocalisation, aggregation, or saturation of normal degradation pathways, none of which reflect how the antibody will perform against endogenous protein in a real experiment. Endogenous tagging preserves native expression levels and regulatory context, so the comparison between anti-tag and anti-target signal is a fairer test of specificity.
The comparison itself should look at more than a single readout. Match subcellular localisation between the anti-tag and anti-target signals in immunofluorescence, match molecular weight in western blot, and where relevant, match immunoprecipitation efficiency. Concordance across all three strengthens confidence considerably more than agreement on a single measure.
Tags are not neutral, and it is worth watching for artefacts they introduce. Large tags such as GFP can sterically block antibody epitopes near the tag insertion site, producing a false negative for an otherwise specific antibody. N-terminal versus C-terminal tag placement can also affect protein folding or trafficking in ways that alter localisation independent of the antibody being tested. If anti-tag and anti-target signals disagree, consider whether the tag itself, rather than the antibody, is responsible before concluding the antibody has failed validation. A rescue experiment, in which tagged protein re-expressed in a knockout background restores the expected antibody signal, remains one of the most persuasive combined controls when genetic and tagged-expression pillars are used together.
Immunocapture and mass spectrometry: running and reading IP-MS
Immunocapture followed by mass spectrometry gives the most direct molecular evidence available: it tells you exactly what proteins the antibody pulled out of a lysate, at the peptide level, rather than inferring specificity from a band position or a staining pattern.
A workable IP-MS validation experiment follows a consistent structure. Incubate the antibody with lysate under conditions matched to its intended application, elute bound proteins, and digest for mass spectrometry analysis. Run essential negative controls alongside the target pulldown: an isotype-matched control antibody processed identically, and ideally a knockout or knockdown lysate processed the same way if one exists. Without these controls, distinguishing a genuine target-specific pulldown from generic sticky binding to the resin or Fc receptors is close to impossible.
Interpretation hinges on where the strongest peptide signal falls. A widely used heuristic, drawn from Structural Genomics Consortium guidance embedded in the IWGAV framework, treats an antibody as specific when the top three peptide hits by abundance correspond to the expected target protein rather than to an unrelated protein or a common contaminant. This is a practical threshold rather than an absolute rule, and it works best alongside quantitative comparison against the negative control rather than a simple presence-or-absence call, since complex members frequently co-purify with a genuine bait protein and can be mistaken for direct antibody binders.
Distinguishing a direct binder from a co-purifying complex member usually requires a follow-up step: cross-referencing hits against known interactome databases, running a reciprocal pulldown with an antibody against the suspected complex partner, or comparing peptide abundance ratios between target and partner across replicate pulldowns. A protein that appears at consistently lower abundance than the bait, and that drops out entirely in a knockout background, is more likely a complex member than an antibody artefact.
Application-specific validation: WB, IHC/IF, IP, ELISA and flow cytometry
Validation earns its value only when it matches the assay the antibody will actually be used in. An antibody cleared for western blot carries no guarantee for immunohistochemistry, and this application dependency is one of the clearest findings to come out of large-scale IWGAV-aligned validation work. Each application needs its own acceptance criteria.
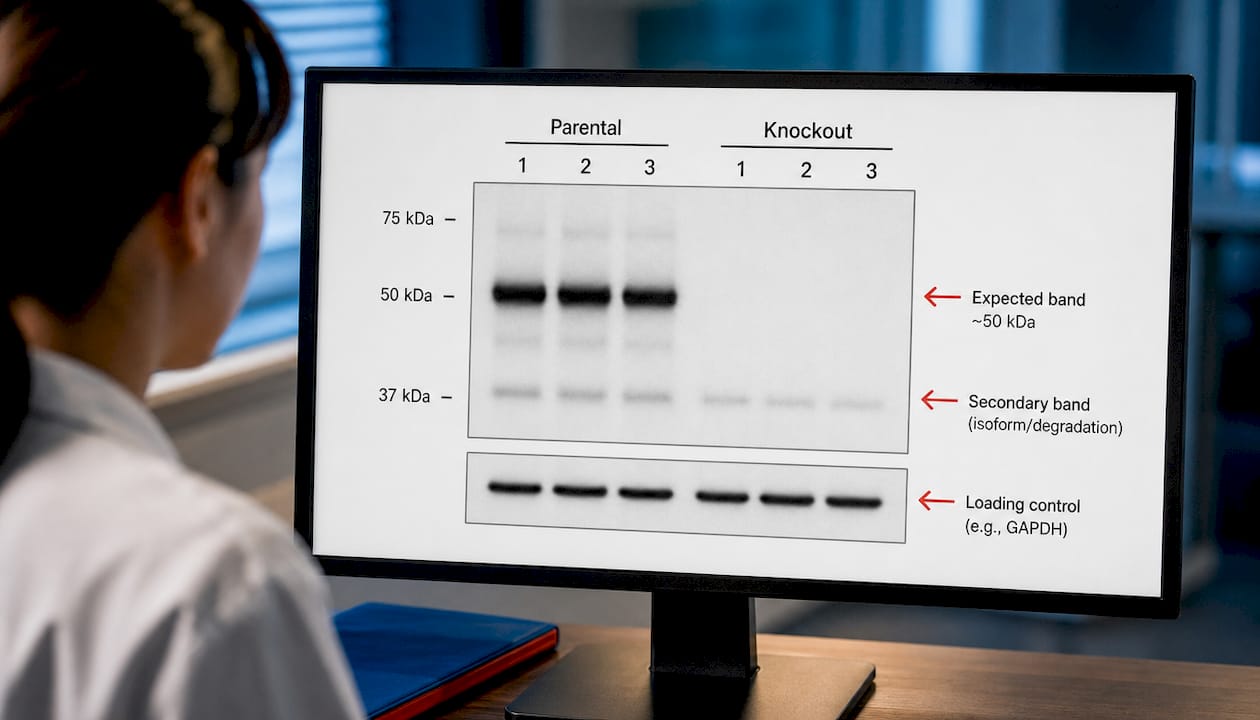
1. Western blot. Look for a single major band at the expected molecular weight, confirmed against a genetic knockout or knockdown lysate where available. Check transfer efficiency with a total protein stain or loading control before concluding a faint or absent band reflects antibody performance rather than a transfer problem. Multiple bands are not automatically disqualifying if the strongest band matches the expected size and disappears in the knockout; secondary bands may reflect isoforms or degradation products worth characterising rather than dismissing.
2. Immunohistochemistry and immunofluorescence. Confirm that staining localises to the expected subcellular compartment or tissue region, using matched positive and negative tissue types with known expression differences. A peptide adsorption control (pre-incubating the antibody with excess immunogen peptide) can help confirm specificity when a genetic negative control tissue is unavailable. Scoring reproducibility across independent observers or automated image analysis is worth checking before relying on staining intensity as a quantitative readout.
3. Immunoprecipitation. Verify enrichment by comparing input lysate against the immunoprecipitated fraction on a western blot, confirming the target is depleted from the supernatant and concentrated in the eluate. Where the IP feeds into a downstream discovery experiment, follow with orthogonal mass spectrometry confirmation rather than assuming pulldown efficiency alone proves specificity.
4. ELISA. Establish a calibration curve across the expected physiological concentration range and confirm linearity within that range. Run a crossreactivity panel against structurally related proteins likely to be present in the same sample type, and assess matrix effects by comparing recovery in buffer alone against recovery in the actual sample matrix (serum, plasma, cell lysate), since matrix components frequently suppress or inflate apparent signal.
5. Flow cytometry. Optimise antibody titre with a dilution series to identify the concentration that maximises signal-to-noise rather than defaulting to the vendor’s suggested dilution. Use fluorescence-minus-one (FMO) controls to set accurate gates, and include isotype controls matched in host species, isotype, and fluorophore to distinguish specific binding from non-specific Fc receptor engagement or background autofluorescence.
A practical checklist before you trust an antibody
Full pillar-by-pillar validation is not always proportionate to the experiment at hand. The Ten Basic Rules of antibody validation offers a condensed, one-page checklist designed for exactly this triage decision, and its mandatory rules are worth applying to every antibody before it reaches the bench.
- Confirm the target is precisely defined, including species, isoform, and post-translational modification state if relevant, since vague target definitions are a common source of downstream confusion.
- Check the vendor’s documented crossreactivity data against related family members, and treat the absence of this data as a gap to fill yourself rather than an implicit pass.
- Verify the antibody concentration or dilution recommended matches the application you intend to use it for, since a dilution validated for IHC says nothing about the correct concentration for flow cytometry.
- Confirm documentation includes lot number, immunogen sequence, and clonality, all of which matter for reproducing results and for troubleshooting if performance shifts later.
- Cross-check whether independent validation data (knockout, orthogonal, or independent antibody comparison) exists publicly before repeating work already done elsewhere.
A short, standardised checklist applied consistently in the lab reduces the chance of committing time and reagents to a poorly characterised antibody, a point the Ten Basic Rules authors make explicitly. It costs a few minutes per antibody and can save weeks of chasing an artefact.
Pro Tip: Reserve full multi-pillar validation for antibodies going into high-risk experiments, clinical translation work, or publication-critical figures. For routine screening antibodies, the checklist above plus one independent antibody comparison is usually a proportionate amount of scrutiny.
Community protocols and open validation datasets
Full independent validation is expensive to repeat for every target, which is why community platforms have become a genuinely practical resource rather than a nice-to-have. YCharOS runs a consensus, knockout cell line-based protocol that systematically compares antibody performance across western blot, immunoprecipitation, and immunofluorescence, and publishes the results openly so labs do not need to repeat the knockout generation step for targets already characterised. A typical YCharOS-style characterisation, run by a mid-level graduate student part-time, takes around a month per target, a useful benchmark when budgeting your own timeline.
The IWGAV framework itself, published through Nature Methods, remains the reference point for the five-pillar structure and is worth reading directly rather than relying solely on secondary summaries. Nature Protocols has since published the detailed YCharOS characterisation workflow as a step-by-step method, useful for labs wanting to replicate the approach on a new target rather than start from first principles.
The Human Protein Atlas and public proteomics repositories function as orthogonal resources in their own right, offering expression data across tissues and cell lines that can support the correlation-based orthogonal validation approach described earlier, without requiring you to generate that dataset yourself.
Common pitfalls that undermine reproducibility
The single most common failure is treating validation as a one-time, application-independent event. An antibody characterised for western blot and then deployed unchecked in immunohistochemistry is one of the most frequent sources of irreproducible results in the literature, and reviews of the field have flagged this mismatch repeatedly.
A second pitfall is relying on vendor datasheet claims without independent confirmation. Published reviews note that there is no universally accepted industry standard governing what a manufacturer must demonstrate before listing an application on a datasheet, so label claims do not reliably predict performance in your specific system.
Lot-to-lot variation is a third recurring issue, often discovered only after a result fails to replicate months later. Polyclonal antibodies are particularly prone to this, since each lot derives from a different animal bleed with a distinct antibody population.
Incomplete knockouts used as negative controls create false confidence in the opposite direction: residual protein masks genuine off-target binding, leading researchers to conclude an antibody is specific when it is not. Finally, single-readout validation, relying on a western blot alone or a stain alone, misses cross-application failures that only appear when the antibody is challenged with a second, independent method. Combining at least two pillars addresses most of these failure modes simultaneously.
Quantitative approaches to affinity and specificity
Beyond qualitative pass/fail validation, quantitative metrics give a more precise picture of antibody performance and allow comparison between candidate antibodies for the same target. Binding affinity, typically expressed as a dissociation constant (KD), can be measured by surface plasmon resonance or biolayer interferometry, giving a numerical sense of how tightly the antibody holds its target relative to alternatives.
Specificity can be quantified through signal-to-noise ratios calculated from titration experiments, comparing signal in target-positive samples against signal in matched negative controls across a dilution series rather than relying on a single concentration point. In IP-MS work, quantitative label-free or isotope-labelled proteomics approaches allow direct comparison of peptide abundance between target pulldown and negative control, rather than a binary presence-or-absence call that can be misled by trace co-purification.
Cross-reactivity can be quantified through panel testing against structurally related proteins, expressing the result as percentage cross-reactivity relative to the primary target signal, a common practice in ELISA validation where multiple family members may be present in the same biological sample. None of these quantitative approaches replace the pillar-based framework; they sharpen the evidence a given pillar produces. A KO-validated antibody with a documented KD and a known cross-reactivity profile gives a downstream user considerably more confidence than a KO check alone.
Validating performance across fixation methods and species
An antibody validated in one sample condition does not automatically perform the same way in another, and fixation method is one of the most consequential variables in this respect. Formalin fixation crosslinks proteins and can mask epitopes that were freely accessible in fresh-frozen tissue, meaning an antibody that works well by immunofluorescence on unfixed cells may require antigen retrieval, or may fail outright, on formalin-fixed paraffin-embedded sections.
When an antibody is intended for both fresh and fixed applications, validate each condition separately rather than assuming performance transfers. This includes testing different fixation durations, since over-fixation compounds epitope masking in ways that are easy to overlook when a protocol has only been tested at a single fixation time.
Species cross-reactivity deserves the same discipline. An antibody raised against a human epitope may or may not recognise the mouse or rat orthologue, depending on sequence conservation at the specific binding site rather than overall protein homology. Vendor claims of cross-species reactivity should be checked against the actual immunogen sequence alignment for your species of interest, and ideally confirmed experimentally with a positive control tissue or cell line from that species before committing an antibody to a multi-species study. Treat each fixation condition and each species as a distinct validation context, not a variation on a single validated result.
Assessing lot-to-lot consistency
Antibody performance can shift between production lots, particularly for polyclonal antibodies sourced from different animal bleeds, and this variability is a frequently overlooked contributor to failed replication attempts.
A practical lot consistency check involves running a new lot alongside a retained sample of the previous lot, side by side, in the exact application and dilution the antibody is used for. Compare band intensity, staining pattern, or signal-to-noise ratio directly rather than relying on a qualitative visual impression from memory of the earlier lot’s performance. Where possible, retain a frozen aliquot of each working lot specifically for this kind of future comparison.
For long-running studies or clinical translation work, documenting lot numbers in every experimental record is not just good practice, it is often the only way to trace a sudden change in results back to a reagent switch rather than a biological effect. Monoclonal antibodies are generally more consistent lot-to-lot than polyclonals, since they derive from a single hybridoma clone, but recombinant monoclonal production changes or storage condition differences can still introduce variation worth checking periodically rather than assuming indefinitely.
Troubleshooting ambiguous validation data
Ambiguous results are the norm in antibody validation, not the exception, and knowing how to interpret them is as important as running the experiment correctly in the first place.
Partial signal loss in a knockout is the most common ambiguous outcome. Before concluding the antibody has residual off-target binding, re-verify the knockout itself with an orthogonal protein-level measurement, since incomplete knockouts are a more frequent explanation than genuine off-target signal. Discordant results between two independent antibodies require checking whether the epitopes truly are non-overlapping; antibodies raised against overlapping regions of the same protein can behave similarly even when one has genuine off-target activity elsewhere.
When orthogonal MS correlation is weak across a sample panel, check the dynamic range of both measurements before concluding the antibody has failed. A narrow expression range in the chosen samples can flatten a correlation that would appear stronger with a more variable panel. When IP-MS identifies an unexpected top hit, resist the urge to immediately discard the antibody; confirm whether the unexpected protein is a known complex partner of the intended target before concluding the antibody itself is non-specific. Document every ambiguous result rather than quietly repeating the experiment until a cleaner outcome appears, since that ambiguity itself is often the most informative part of the validation record.
Regulatory context and standards for antibody validation
No single regulatory body currently mandates a specific antibody validation protocol for research-use antibodies, and this absence of a binding standard is precisely why community frameworks like IWGAV have become the de facto reference point across academic and industry labs alike.
For diagnostic and clinical applications, antibodies used in regulated assays fall under broader quality system requirements, such as those enforced by the US Food and Drug Administration for in vitro diagnostic devices, which require documented analytical validation including specificity, precision, and lot consistency data as part of the device submission. Research-use-only antibodies used upstream of clinical decision-making are not held to the same formal submission requirements, but journals and funding bodies increasingly expect IWGAV-aligned validation evidence as a condition of publication or grant reporting, effectively creating a soft standard where a formal regulatory one does not exist.
Minimum information reporting frameworks, sometimes referenced under initiatives addressing minimum information about cellular assay reagents and methods, push in the same direction: documenting antibody clone, catalogue number, lot, dilution, and validation evidence alongside any published figure. Treat these reporting expectations as a floor rather than a ceiling. Meeting a journal’s minimum reporting checklist is not the same as having performed adequate validation for your specific application, and the two should not be conflated when planning experimental rigour.
What actually separates rigorous labs from the rest
Most antibody failures do not come from a bad reagent. They come from validation performed once, for one application, then trusted indefinitely across every other use the antibody is put to. That single habit, more than any individual pillar, is what separates labs with reproducible antibody-dependent data from labs that quietly repeat failed experiments without ever tracing the cause back to the reagent.
The five-pillar framework is not a bureaucratic overlay on top of real science. It reflects a simple, defensible principle: specificity claims need evidence proportional to how much the result matters. A screening antibody used once for a low-stakes pilot experiment does not need the same scrutiny as an antibody underpinning a clinical translation programme or a headline figure in a paper. Matching validation effort to consequence, rather than applying either no scrutiny or maximal scrutiny uniformly, is the practical skill this framework is actually teaching.
Procurement decisions matter more than most protocol sections acknowledge. Choosing a supplier with clear manufacturer identity and documented validation evidence at the point of purchase removes an entire category of downstream troubleshooting, because it starts the validation process with better information rather than a blank datasheet and a hopeful assumption. Products like ABMIUM’s anti-mouse CD8a antibody illustrate the kind of documentation a vendor should provide as standard, target definition, clonality, and application data, rather than as an optional extra.
— Veron
ABMIUM MATCH and independent validation support
Choosing between candidate antibodies before you have committed lab time to validation is exactly the scenario a scientist-led reagent sourcing service was built for. Submit your experimental requirements, target, species, application, and receive expert review of suitable products and comparisons of the supporting evidence already available, rather than interpreting multiple datasheets against the five pillars alone.

Some situations warrant going further than comparing existing evidence. High-risk experiments feeding into clinical translation work, batch-to-batch verification programmes, or targets where no independent knockout data exists publicly are all scenarios where ABMIUM’s Product Validation Service adds real value, alongside native mass spectrometry and spatial validation delivered through specialist collaborators for labs that need IP-MS or tissue-level confirmation beyond what a standard datasheet supports. For targets that need a genuinely new reagent rather than a better-characterised existing one, the Custom Antibody Service covers bespoke development alongside custom protein and ELISA work.
If your immediate need is simply sourcing a well-documented reagent rather than a bespoke validation programme, browse the primary antibodies catalogue and filter by target, application, and available validation evidence before adding anything to your protocol.
Sources
The primary reference for the five-pillar framework is the IWGAV’s proposal for antibody validation published in Nature Methods, alongside its large-scale follow-up validation studies. For a fast, practical checklist, the Ten Basic Rules of antibody validation fits on a single page and covers the mandatory minimum checks. The YCharOS consensus characterisation protocol in Nature Protocols is the most detailed openly published workflow for knockout-based comparison across western blot, immunoprecipitation, and immunofluorescence. Broader reviews of the reproducibility challenges in antibody validation provide useful context for why these frameworks emerged, and the RareLabs knowledge resource offers further reading on reproducibility in translational research pipelines specifically.
- IWGAV follow-up and large‑scale validation studies (PMC)
FAQ
How do you validate an antibody?
You validate an antibody by applying at least one, and ideally two or more, of the five IWGAV pillars: genetic knockout or knockdown, orthogonal proteomics correlation, independent antibody comparison, tagged expression, or immunocapture mass spectrometry. Validation must be repeated for each specific application (western blot, IHC, IP, and so on) rather than assumed from one context to another, as confirmed in IWGAV follow-up literature.
What are the five pillars of antibody validation?
The IWGAV five pillars are genetic strategies, orthogonal strategies, independent antibody strategies, tagged protein expression, and immunocapture followed by mass spectrometry. Each demonstrates specificity differently, and rigorous validation typically combines two or more of them rather than relying on a single pillar.
What are three types of validation?
Within the five-pillar framework, three of the most commonly applied types are genetic validation (knockout or knockdown), orthogonal validation (correlating antibody signal with independent proteomics data), and independent antibody validation (comparing antibodies against non-overlapping epitopes). Tagged expression and immunocapture mass spectrometry complete the full five-pillar set for more demanding validation needs.
What is the 3 and 3 rule in antibody identification?
There is no formally defined number-based rule in the antibody validation literature. A related and genuinely documented heuristic from Structural Genomics Consortium guidance, embedded in the IWGAV framework, treats an antibody as specific in IP-MS when the majority of its top peptide hits by abundance correspond to the expected target protein rather than an unrelated protein.
How long does antibody validation typically take?
A knockout cell line based characterisation, following the YCharOS consensus protocol, typically takes around a month for a mid-level graduate student working part-time on a single target. Lighter validation, such as an independent antibody comparison or a checklist review against the Ten Basic Rules, can be completed in days.