

The secondary must match the primary’s host species and isotype, and its conjugate must suit your detection method. Get either wrong and the experiment fails regardless of how good the primary is. For most western blots, an HRP-conjugated anti-species IgG solves the job. For multi-label immunofluorescence or Fc-receptor-rich tissue, a cross-adsorbed or F(ab’)2 fragment secondary avoids the background that ruins publication-quality images. No secondary rescues an unvalidated primary, so check both datasheets before you order either.
TL;DR:
- Ensuring the secondary antibody’s host species and isotype precisely match the primary antibody is critical for reliable detection, with ignores leading to weak or absent signal.
- Choosing the right antibody format, such as F(ab’)2 or Fab fragments, can significantly reduce background caused by Fc receptor interactions, especially in Fc-rich tissues.
- Cross-adsorbed secondary antibodies are essential when working with multiple primary species or endogenous immunoglobulins to prevent cross-reactivity and nonspecific binding.
- Validating the secondary reagent’s lot-specific performance and confirming details like application suitability and cross-adsorption firsthand reduces experiment failures.
- Titrating secondary antibody dilutions and matching blocking strategies meticulously improve signal clarity and minimize background noise.
Table of Contents
- What is secondary antibody selection and why does it matter?
- How do secondary antibody applications differ by method?
- What dilutions and conditions actually reduce background?
- What should a secondary antibody datasheet actually tell you?
- How does ABMIUM support secondary antibody selection?
- A researcher’s take on getting this right the first time
- Order verified secondaries and request validation through our specialist supplier
- Sources
- FAQ
What is secondary antibody selection and why does it matter?
Secondary antibody selection is the process of choosing a detection reagent that binds specifically to your primary antibody’s host species and isotype, then carries the right conjugate for your assay. It sounds simple until you consider how many failure points sit inside that one sentence. Get the host species wrong and you get no signal at all. Get the isotype wrong and you might get a faint one that looks real but isn’t. Choose the wrong conjugate and you either burn out your detector or lose your dynamic range entirely.
The importance of secondary antibodies gets underestimated because researchers tend to focus their validation effort on the primary. That’s backwards in one specific sense: the primary determines specificity for your target, but the secondary determines whether you actually see that specificity or drown it in noise. A five-step decision flow keeps the choice consistent across projects.
Step 1: confirm the primary’s host and isotype
Every secondary antibody targets a specific host species (the animal the primary was raised in) and, in many cases, a specific isotype or subclass within that species. A goat anti-mouse IgG will not reliably detect a mouse IgM primary, because IgM and IgG differ enough in structure that anti-IgG reagents often show weak or absent binding to IgM. Mouse and rat subclasses (IgG1, IgG2a, IgG2b, IgG3) can also differ enough that a pan-IgG secondary underperforms against a subclass-restricted one, particularly in flow cytometry panels where every decibel of signal counts.
Check the primary’s product page for its exact isotype, not just “mouse monoclonal.” If you’re working with a less common host, such as hamster, verify the strain too: anti-hamster secondaries don’t cross-react uniformly between Syrian and Armenian hamster strains, and assuming otherwise is a common cause of unexplained blank results.
Step 2: decide on antibody format
Whole IgG is the default and works for most applications, but it isn’t always the right tool.
- Whole IgG carries two Fc regions and two antigen-binding sites, giving strong avidity and signal amplification. It’s the standard choice for western blot and most ELISA formats.
- F(ab’)2 fragments retain both antigen-binding arms but lack the Fc region entirely, which removes Fc-receptor-mediated binding. This matters enormously in tissue rich in Fc receptors, such as spleen, lymph node, and many tumour infiltrates, where whole IgG secondaries bind non-specifically through Fc receptors on macrophages and B cells and generate background that looks like real staining.
- Fab fragments carry a single antigen-binding site with no Fc region. They penetrate dense tissue better than whole IgG or F(ab’)2, useful in thick sections or whole-mount immunofluorescence, though the trade-off is lower avidity and often a dimmer signal.
- VHH (single-domain) formats, derived from camelid heavy-chain-only antibodies, are smaller still. Their size gives excellent penetration and low steric hindrance in crowded epitope environments, though availability as secondaries is more limited than conventional formats.
Fragments cost more per test but solve a specific problem: Fc-mediated non-specific binding. If your background is uniform and diffuse rather than target-shaped, format is often the fix before you touch blocking buffer.
Step 3: choose secondary host species and manage cross-reactivity
The secondary’s own host species matters most when you’re running multiplex staining with two or more primaries from different species. If your primaries are mouse and rabbit, you’ll typically use an anti-mouse secondary and an anti-rabbit secondary raised in a third species, commonly goat or donkey, to avoid the anti-mouse reagent picking up the rabbit primary and vice versa.
The complication arrives when both primaries share a host species, or when your sample itself contains immunoglobulins from the secondary’s target species (common in tissue sections, where endogenous mouse or human IgG sits in the sample and gets picked up by an anti-mouse or anti-human secondary that wasn’t adsorbed against it). This is where cross-adsorption becomes essential rather than optional, and it deserves its own explanation below.
Step 4: decide on purification method
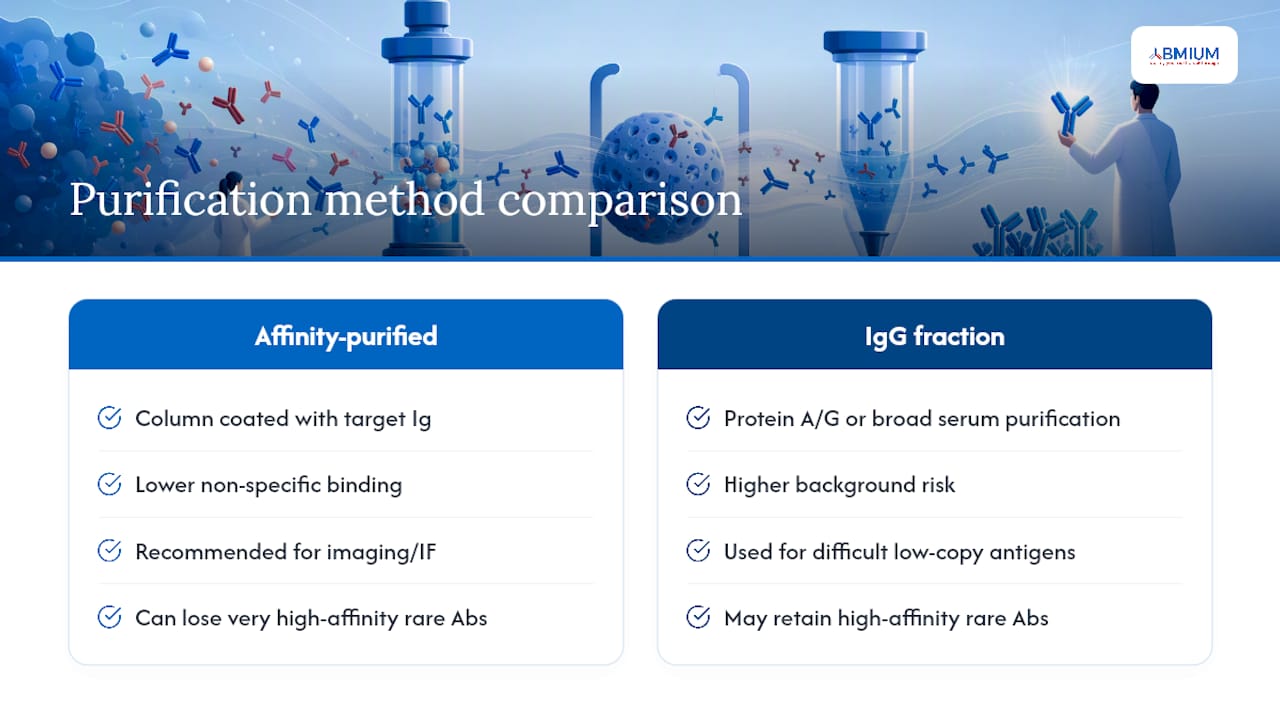
Two purification tiers turn up on most datasheets: affinity-purified and IgG fraction (sometimes labelled whole serum IgG or protein A/G purified).
Affinity-purified secondaries have been passed through a column coated with the target immunoglobulin, isolating only antibodies that bind that specific species and isotype. This typically produces lower non-specific binding and cleaner backgrounds, which is why it’s the default recommendation for immunofluorescence and other imaging applications where background directly degrades image quality.
IgG fraction secondaries are purified from serum by broader methods (often protein A or protein G columns) without the species-specific affinity step. They contain a wider pool of antibodies and can show more background, but there’s a real trade-off worth knowing: exceptionally high-affinity antibodies within a serum pool can sometimes fail to elute from an affinity column during the purification process, meaning affinity purification can occasionally strip out the very antibodies that would give the strongest signal against a rare or low-abundance target. For difficult, low-copy antigens, an IgG fraction reagent is sometimes the more sensitive choice despite the higher background risk.
Step 5: match the conjugate to your detection method
The final decision step is conjugate choice, and it should be dictated entirely by how you’re planning to read the signal:
- Enzyme conjugates (horseradish peroxidase or alkaline phosphatase) suit western blot and chromogenic or chemiluminescent ELISA, where signal amplification through enzymatic turnover gives strong sensitivity.
- Fluorophore conjugates suit immunofluorescence and flow cytometry, where you need spectrally distinct signals for multiplexing and quantitative readout.
- Biotin conjugates paired with streptavidin-enzyme or streptavidin-fluorophore systems add an amplification step, useful when your target is low abundance and a direct conjugate isn’t sensitive enough.
Brightness and photostability matter more than most people budget for when picking a fluorophore. A dim, fast-bleaching dye on a low-abundance target will give you a false negative that looks identical to a real one.
How do secondary antibody applications differ by method?
Application-specific selection is where the five decision steps above turn into concrete choices, because western blot, IHC/IF, flow cytometry, and ELISA each punish different mistakes.
Western blot
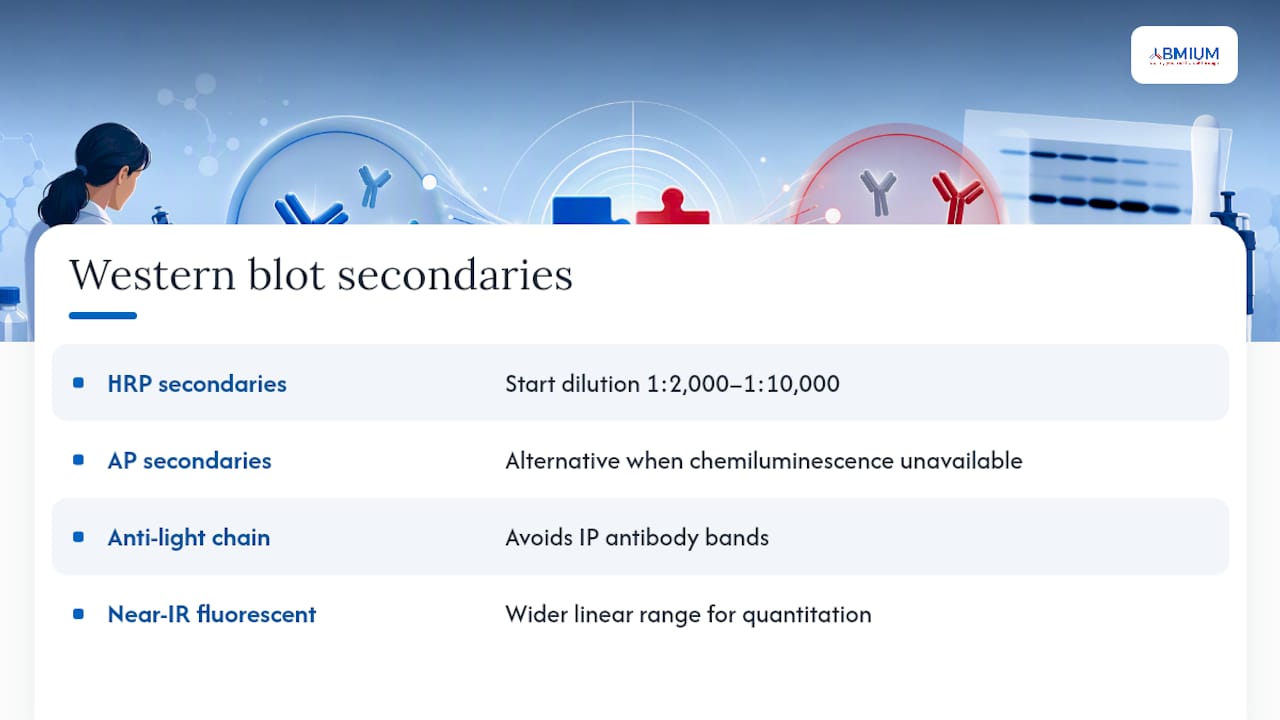
HRP-conjugated anti-species secondaries remain the standard for chemiluminescent detection, giving strong signal amplification through substrate turnover and compatibility with almost every imaging system in a standard lab. AP conjugates are a reasonable alternative when chemiluminescence isn’t available, though they’re less common now. A typical starting dilution for HRP secondaries sits between 1:2,000 and 1:10,000, though this varies by manufacturer and must be titrated against your specific blot conditions rather than assumed.
If your primary was used for immunoprecipitation and you’re now detecting it on a blot, a standard anti-species secondary will also detect the heavy and light chains of the IP antibody itself, creating a strong band that obscures your target if it runs near 50 or 25 kDa. An anti-light chain specific secondary avoids this by binding a light chain epitope not present in most target proteins, solving a problem that catches out a lot of researchers running IP-western workflows for the first time.
For quantitative western blot, near-infrared fluorescent secondaries paired with a dedicated imager offer a wider linear dynamic range than chemiluminescence, letting you compare band intensities across a blot with more confidence than film or CCD chemiluminescent exposure typically allows.
IHC and immunofluorescence
Tissue sections carry two chronic problems: Fc-receptor background and autofluorescence. F(ab’)2 or Fab fragments address the first by removing the Fc region that macrophages and other Fc-receptor-bearing cells bind non-specifically. A dedicated Fc-blocking step before applying the secondary tackles the same issue from a different angle and the two approaches combine well.
Autofluorescence, particularly in fixed tissue, tends to concentrate in shorter wavelengths (green and yellow channels). Choosing far-red or near-infrared conjugated secondaries for your key targets shifts the signal away from where autofluorescence is worst, which is a simple fix that gets overlooked far more often than it should. Checking expected target abundance against a resource like the Human Protein Atlas before you start helps you anticipate whether a low-abundance target will need a brighter dye or an amplification step to clear the autofluorescent background.
Flow cytometry
Panel design lives or dies on fluorophore brightness and spectral separation. Bright dyes such as PE or APC-based conjugates suit low-abundance surface markers, while dimmer dyes like FITC are better reserved for high-abundance targets where signal isn’t the limiting factor. Tandem dyes (PE-Cy5, APC-Cy7, and similar) are powerful for extending panel size but degrade over time and are more sensitive to photobleaching and compensation errors, so they’re best avoided in panels where your compensation controls or instrument configuration are already stretched thin.
For panels beyond eight or so colours, directly conjugated primary antibodies are often a cleaner alternative to a two-step primary-secondary system, removing an entire layer of potential cross-reactivity between species-matched primaries.
ELISA
Sandwich ELISA formats depend on cross-adsorbed secondaries when the capture and detection antibodies share a host species, to prevent the secondary from binding the capture antibody instead of the detection antibody. Enzyme-conjugated secondaries (HRP most commonly) remain standard, and biotin-streptavidin amplification systems extend sensitivity for low-abundance analytes where a direct enzyme conjugate doesn’t clear the detection limit. Checking expected protein abundance through a resource such as ProteomicsDB before assay design gives a reasonable estimate of whether amplification is worth building into the protocol from the outset.
Pro Tip: Run a no-primary control alongside every new secondary-application pairing. If you see signal without the primary present, the problem sits entirely with the secondary or the blocking step, and you’ve just saved yourself a week of troubleshooting the wrong variable.
What dilutions and conditions actually reduce background?
Practical parameters separate a clean result from a frustrating one, and most problems trace back to just three variables: dilution, blocking, and Fc handling.
- Titrate, don’t guess. Manufacturer-recommended dilutions are starting points, not fixed values. Run a short titration series (typically three to five dilutions spanning the recommended range and one dilution above and below it) against a known positive sample, and choose the concentration that gives the cleanest signal-to-noise ratio rather than the strongest raw signal. A secondary run too concentrated amplifies background as readily as it amplifies real signal.
- Match your blocking reagent to your primary and conjugate. Non-fat dry milk is a cheap, effective blocker for most western blots, but it contains casein phosphoproteins that can interfere with phospho-specific primary antibodies, giving false negatives on phospho-blots. BSA is a safer default for phospho-targets. Serum-based blockers (matched to the secondary’s host species, ideally) work well for IHC and IF, reducing Fc-mediated background further when combined with a fragment secondary.
- Handle Fc receptors deliberately. In tissue or cell populations rich in Fc receptors, a dedicated Fc-blocking reagent applied before the primary, combined with an F(ab’)2 or Fab secondary, addresses the two most common sources of non-specific tissue background from both directions.
- Work through background systematically when it appears. High, diffuse background usually points to inadequate blocking or a non-adsorbed secondary in a multi-species sample; check cross-adsorption specs first. Weak or absent signal usually means the secondary needs titrating upward, or the primary itself has failed, so verify the primary on a known positive control before troubleshooting the secondary further. Cross-reactivity in multicolour panels almost always traces back to insufficient cross-adsorption between host species or spectral overlap between chosen fluorophores that wasn’t caught during panel design.
Incubation time also matters more than most people budget for. Room temperature for 30 to 60 minutes suits most secondary incubations, but 4°C overnight incubations, common for low-abundance targets, tend to reduce background further because non-specific binding is generally less stable at lower temperatures than specific binding.
What should a secondary antibody datasheet actually tell you?
A datasheet earns its place in your protocol only if it gives you evidence, not just a product description. Before ordering, check for these fields specifically:
- Tested applications, listed explicitly (WB, IHC, IF, flow, ELISA), rather than a generic “suitable for most immunoassays” claim with no application-specific data behind it.
- Recommended dilution ranges per application, not a single blanket dilution used across every method.
- Cross-adsorption details, naming exactly which species the secondary has been adsorbed against, since “cross-adsorbed” with no species listed tells you nothing useful.
- Lot-specific validation data, ideally with images from the actual application you’re planning to run, not a stock photo reused across every lot.
- Recommended positive and negative controls, including whether a no-primary control was run during validation.
- Storage and stability conditions, including whether the conjugate is light-sensitive (most fluorophores are) and the expected shelf life once reconstituted.
Good validation shows its working: real images from the intended application, a species reactivity panel confirming the secondary doesn’t cross-react with related species you might also be working with, and reproducibility notes across more than one lot. When a datasheet is thin on any of this, contact technical support directly and ask for the missing data before you commit budget, or request a small-quantity trial size if one is available, particularly for expensive or novel conjugates you haven’t used before. Cross-checking the target’s expected isoform range through UniProt beforehand also helps confirm the epitope region a secondary’s paired primary is claiming to detect actually exists in the sample you’re working with.
How does ABMIUM support secondary antibody selection?
Sourcing inconsistency is one of the quieter causes of failed experiments, and it rarely shows up until a repeat order behaves differently from the batch that worked. ABMIUM was built around that specific problem: verified sourcing, pre-purchase validation, and scientific support designed to catch mismatches before they cost you a week of bench time.
- Verified sourcing means every reagent’s provenance is reviewed before it reaches the catalogue, reducing the guesswork that comes with unfamiliar or hybrid manufacturers.
- Pre-purchase validation gives researchers a clearer picture of expected performance before committing budget, cutting down on the redundant repeat purchases that eat into project timelines.
- Independent validation services are available for the harder cases: novel primaries without established literature, rare antigens with limited reference data, or unusual host species where cross-reactivity data is thin. These are worth requesting specifically when a standard datasheet doesn’t answer your question.
| What you need | How ABMIUM supports it |
|---|---|
| Confidence in reagent provenance | Verified sourcing and transparency review before listing |
| Evidence before spending | Pre-purchase validation support |
| Difficult or novel targets | Independent validation services on request |
| Reduced repeat-order failures | Scientific support for product comparison |
The underlying logic matches the decision flow in this guide: a secondary is only as good as its documented match to your primary, and validation evidence should exist before the order ships, not after the experiment fails.
A researcher’s take on getting this right the first time
Most secondary antibody failures are not exotic. They’re the same three mistakes repeated across labs: an unchecked isotype, a conjugate picked for convenience rather than the detection method, and a skipped cross-adsorption check on a multi-species sample. None of that requires more expensive reagents to fix. It requires slowing down at the ordering stage, which is the cheapest place in the whole workflow to catch a problem.
Before you place an order, run three checks. First, confirm the primary’s exact host species and isotype against the secondary’s stated target, not just a rough species match. Second, confirm the conjugate suits your actual detection instrument, not a similar one you used on a different project. Third, confirm cross-adsorption specifications if you’re running more than one primary from related species, or working with a tissue sample carrying endogenous immunoglobulins.
Validate on a small scale before committing to a full experiment series. A short titration on a known positive sample costs you an afternoon; a failed full-panel flow experiment costs you a week and a reagent budget you didn’t plan to spend twice.
— Veron
Order verified secondaries and request validation through our specialist supplier
A specialised supplier provides access to an actual catalogue with provenance reviewed before listing, and pre-purchase validation support to help you assess if reagents suit your specific primary pairing before committing budget.

For common workflows, browse the anti-mouse IgG secondary or anti-rat IgG secondary product pages directly, both listed with application data rather than a single generic dilution figure. If your project involves a novel primary, a rare antigen, or an unusual host species where standard cross-reactivity data falls short, request ABMIUM’s independent validation service before you order in volume. Start by browsing the ABMIUM catalogue or checking a specific product page for the datasheet fields covered above.
Sources
Before ordering any antibody, confirming the target’s identity and expected behaviour saves far more time than it costs, and following peptide laboratory standards: quality & testing guide helps ensure immunogen quality in design and controls. NCBI Gene lists accession numbers, synonyms, and known splice variants, useful for confirming you’re ordering against the correct gene identity rather than a similarly named paralogue. UniProt adds curated sequence and domain data, which helps check that an antibody’s stated epitope region actually falls within a functional or accessible part of the protein. GeneCards offers a faster cross-check of aliases and expression summaries when a supplier datasheet uses an unfamiliar target name. For expected abundance and tissue distribution, ProteomicsDB and the Human Protein Atlas both draw on experimental evidence rather than marketing copy, giving a more honest picture of what signal strength to expect.
FAQ
How do you select the right secondary antibody?
Match the secondary’s target species and isotype to your primary, choose a conjugate compatible with your detection method, and use a cross-adsorbed or fragment format if your sample involves multiple species or Fc-receptor-rich tissue.
What does a secondary antibody actually do?
A secondary antibody binds to the primary antibody rather than the target itself, carrying a conjugate (enzyme, fluorophore, or biotin) that generates the detectable signal.
What is the difference between a primary and a secondary antibody?
The primary antibody binds directly to your target of interest, while the secondary antibody binds the primary and provides the label used for detection, allowing one labelled secondary to work with many unlabelled primaries.
How long should secondary antibodies be incubated?
Most secondary incubations run 30 to 60 minutes at room temperature, though longer incubations at 4°C, often overnight, are common for low-abundance targets where reducing non-specific background matters more than speed.
Should you choose affinity-purified or IgG fraction secondaries?
Affinity-purified secondaries generally give cleaner backgrounds and suit most imaging applications, while IgG fraction reagents can sometimes retain higher-affinity antibodies lost during affinity elution, making them worth considering for rare or low-abundance targets.