

Independent antibody validation compares detection by antibodies that bind non-overlapping epitopes on the same target. When two such antibodies produce concordant results across an assay, confidence in specificity rises sharply. Use it as a fast specificity check on a new reagent, or as one arm of a broader validation plan alongside genetic and orthogonal methods. Discordant results are not a failure; they are a signal that more work is needed before you trust the data.
TL;DR:
- Independent antibody validation offers a quick, cost-effective specificity check by comparing two antibodies raised against different protein regions, but it cannot confirm absolute specificity alone.
- It is most effective when used early and alongside genetic controls, especially for high-stakes targets, since tissue type and sample preparation can influence results.
- Running validation involves testing multiple samples, including knockouts, across techniques like western blot and immunofluorescence, with thorough documentation of all conditions and controls.
- Selecting antibodies based on immunogen data and using recombinant monoclonals enhances reproducibility, while proper controls are essential for accurate interpretation of concordant and discordant results.
- Transparent validation data, including negative controls and lot comparisons, is crucial for trustworthy results and can be supported by third-party validation services to reduce wasted effort and maximize reproducibility.
Table of Contents
- What is independent antibody validation and how does it fit the IWGAV pillars?
- When should you use independent antibody validation?
- How do you run independent antibody validation at the bench?
- How do you choose independent antibodies and design controls?
- How do you interpret concordant and discordant results?
- What belongs in a validation checklist and report?
- ABMIUM and independent validation services: how a provider can help
- Why transparency in validation data matters more than any single method
- How ABMIUM supports your validation workflow
- Sources
- FAQ
What is independent antibody validation and how does it fit the IWGAV pillars?
The International Working Group for Antibody Validation (IWGAV) set out five recognised strategies for confirming that an antibody detects what its datasheet claims: genetic validation, orthogonal strategies, independent antibody comparison, tagged protein expression, and immunocapture mass spectrometry. Each pillar attacks the specificity question from a different angle, and the enhanced validation framework describes how applying at least one pillar allowed researchers to validate thousands of antibodies in a single systematic effort.
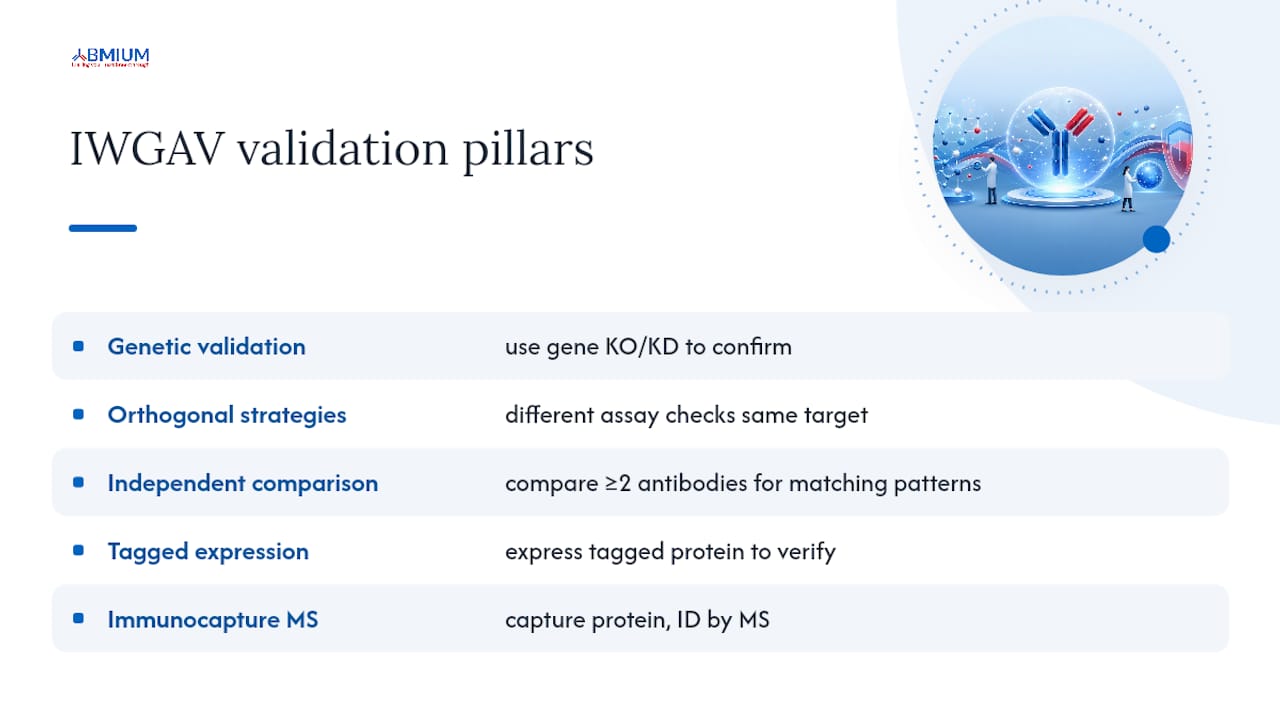
Independent antibody validation sits within this framework as a comparative method. You run two or more antibodies, ideally raised against different, non-overlapping regions of the same protein, and check whether they produce matching patterns on western blot, in imaging, or in immunoprecipitation. Agreement between reagents that were generated independently, often by different manufacturers using different immunogens, is difficult to explain by coincidence.
Its main limitation is that it cannot rule out a shared false signal if both antibodies happen to cross-react with the same off-target protein, which does happen more often than researchers expect. That is why IWGAV frames it as one pillar among five rather than a stand-alone proof. Published consensus efforts have used it as a triage step, flagging antibodies worth carrying forward into genetic or mass spectrometry confirmation, which keeps expensive orthogonal work focused on the reagents most likely to succeed.
When should you use independent antibody validation?
The strategy works across most standard immunoassays: western blot, immunofluorescence, immunohistochemistry, immunoprecipitation, ELISA, and flow cytometry all lend themselves to a two-antibody comparison. It is particularly useful early in a project, before committing to a single primary antibody for a multi-year study.
Target abundance matters more than most researchers assume. A low-abundance protein in a heterogeneous tissue sample can produce a faint or absent signal with one antibody simply because of epitope accessibility, not because the antibody is non-specific. Fixation method, membrane permeabilisation, and even the buffer used for lysis can expose or mask epitopes differently for antibodies binding different regions of the same protein. Tissue type compounds this: a paraffin-embedded section subjected to heat-induced epitope retrieval behaves very differently from a fresh-frozen cryosection.
For high-stakes targets, such as a biomarker feeding into a clinical decision or a drug target under active development, independent antibody comparison alone is rarely sufficient. Pair it with a genetic control wherever a knockout or knockdown line is feasible, and reserve independent-antibody testing for the early screening stage.
How do you run independent antibody validation at the bench?
Each application needs its own control logic, but the underlying principle stays constant across all three workflows below: challenge the antibody with a sample where you already know, or can independently confirm, whether the target is present.
Western blot protocol
- Assemble a multi-lysate panel: one high-expression positive sample, one low or negative-expression sample, and, where a cell line exists, a CRISPR/Cas9 knockout or siRNA knockdown negative control.
- Run a titration series for each antibody, typically 1:500 to 1:2,000 for a monoclonal and 1:1,000 to 1:5,000 for a polyclonal, to find the dilution that gives a clean signal without excessive background.
- Load matched samples for both independent antibodies on parallel blots or lanes, using identical transfer and blocking conditions.
- Compare band size against the predicted molecular weight and check whether both antibodies detect the same isoforms in the same relative proportions.
- Where a knockout line is available, confirm the band disappears in both antibodies simultaneously. This is the strongest single piece of evidence you can generate on a blot, and the Nature Protocols consensus platform describes a scalable, knockout-based version of exactly this workflow.
- Quantify band intensity relative to a loading control and archive the raw scan, not just a cropped image.
Immunofluorescence and immunohistochemistry protocol
- Use a matched sample panel: known-positive tissue or cells, a negative-expression sample, and a knockout or knockdown line if one exists for your target.
- Standardise fixation (typically 4% paraformaldehyde for 10 to 15 minutes) and antigen retrieval conditions before comparing antibodies, since differences here can masquerade as specificity differences.
- Stain adjacent sections or parallel wells with each independent antibody and image under identical exposure settings.
- Check for co-localisation with a known marker or organelle stain when subcellular pattern matters to your hypothesis.
- Include a secondary-only control on every plate to rule out non-specific secondary binding before you interpret any primary antibody signal.
Immunoprecipitation and ELISA protocol
For IP, choose a capture antibody and a detection antibody that bind genuinely non-overlapping epitopes. Using two antibodies raised against the same immunogen region defeats the purpose, since both may share the same off-target liability. Run an input sample alongside your elution to confirm the target was present before pull-down, and include an isotype-matched control antibody to check for non-specific capture. For ELISA, cross-titrate both capture and detection reagents against a dilution series of recombinant antigen where available, and watch for a hook effect at high concentrations, which can be mistaken for poor sensitivity.
Across all three workflows, run at least two biological replicates before drawing conclusions, and log clone, catalogue number, and lot alongside every dilution and incubation time.
Pro Tip: Keep a single shared spreadsheet per target protein logging every antibody, lot, dilution and result across all three assay types. Discordance patterns that look random assay by assay often make sense once you see them side by side.
How do you choose independent antibodies and design controls?
Start with the immunogen sequence or epitope map on the datasheet, not the marketing claims. Two antibodies raised against overlapping peptide fragments are not truly independent, even if they came from different suppliers, because a structural feature causing off-target binding in one is likely shared by the other. The European antibody network’s practical guide recommends reviewing immunogen data as a first filter before any bench work begins.
Recombinant monoclonal antibodies generally give the most reproducible results between lots, since the sequence is fixed and manufacturing is consistent. Traditional monoclonals from hybridoma lines can drift over passages. Polyclonal antibodies bring a different trade-off: because they recognise multiple epitopes across the antigen, a polyclonal paired with a monoclonal is a pragmatic independent-antibody strategy when detailed epitope maps are unavailable, since it is unlikely both will fail for the same structural reason.
Build your control panel before you touch the primary data:
- A positive-expression sample with independently confirmed target presence.
- A CRISPR/Cas9 knockout or siRNA knockdown negative control wherever a cell line permits it.
- An isotype-matched control antibody at the same concentration as your primary.
- A secondary-only control on every imaging or blotting run.
Pro Tip: When no knockout line exists for your target, a tissue or cell line with genuinely undetectable expression by RNA-seq or public expression atlases makes a reasonable substitute negative control, though it is weaker evidence than a genetic knockout.
How do you interpret concordant and discordant results?
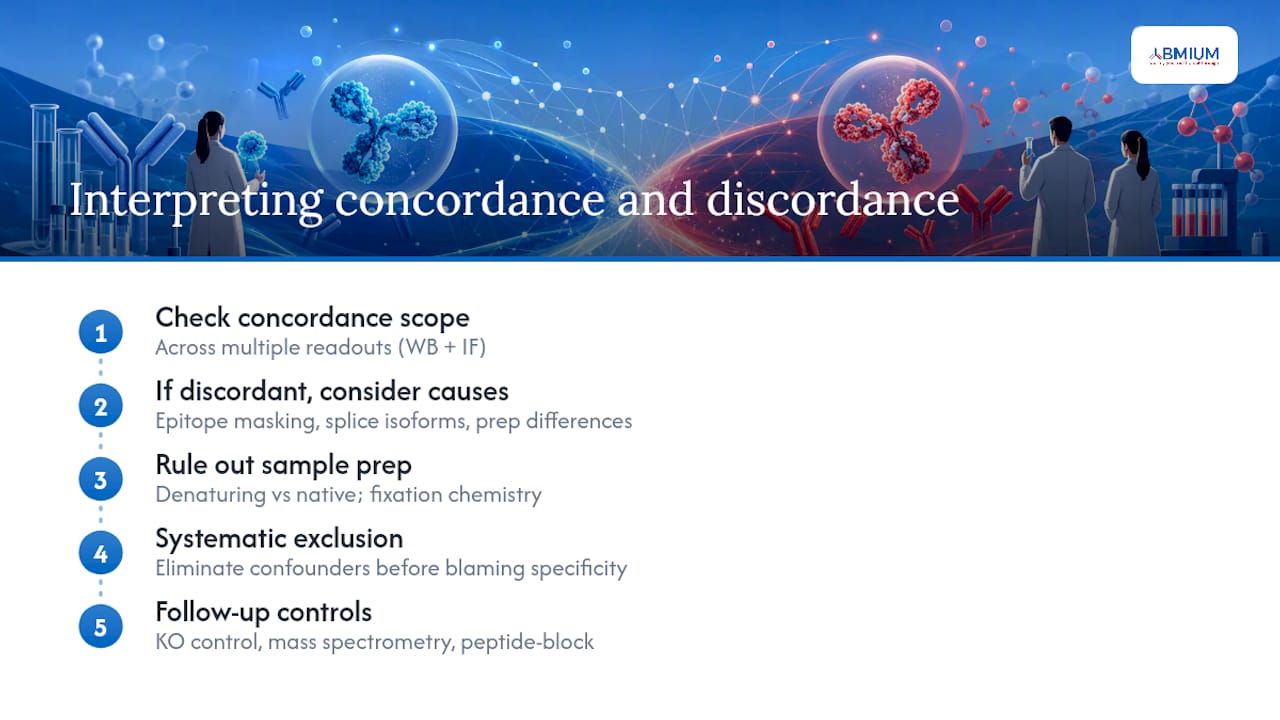
Concordance across independent antibodies is most persuasive when it holds across more than one readout: matching band size on western blot and matching subcellular localisation on immunofluorescence, for example, rather than agreement on a single assay alone. That kind of cross-assay agreement is difficult to attribute to chance.
Discordance is common and rarely means one antibody is simply wrong. Epitope masking is the most frequent cause: a post-translational modification, a binding partner, or a conformational change can hide the exact region one antibody targets while leaving the other’s epitope exposed. Splice isoforms present another trap, since two antibodies targeting different exons will legitimately detect different bands from the same gene. Sample preparation differences, denaturing versus native conditions, or fixation chemistry, can also produce apparent disagreement that has nothing to do with specificity.
Before concluding an antibody is non-specific, rule out these confounders systematically. If discordance persists after checking sample prep, follow up with a genetic knockout control, an orthogonal method such as mass spectrometry, or a peptide-blocking experiment where pre-incubating the antibody with excess immunogen peptide should abolish a true signal.
What belongs in a validation checklist and report?
A reproducible validation record needs the same rigour as the experiment itself. At minimum, document clone or catalogue number, lot number, buffer composition, blocking conditions, incubation times and temperatures, dilution used, and the number of biological and technical replicates.
The third-party test of 614 commercial antibodies found substantial variability in how thoroughly manufacturers documented their own validation data, which is precisely the gap independent, researcher-led validation is meant to close.
Your report should include:
- Raw, uncropped gel and blot images, not just cropped figures.
- Quantitation data with the analysis method stated (densitometry software, region-of-interest settings).
- The specific negative and positive controls used, and whether a genetic knockout was included.
- Lot-to-lot comparison data if more than one lot was tested.
Depositing this material in an open repository, alongside the primary publication, lets other labs check your antibody’s behaviour against their own before repeating months of work unnecessarily.
ABMIUM and independent validation services: how a provider can help
Sourcing a reagent with a genuinely documented history is often harder than running the validation experiment itself. ABMIUM offers a solution to the challenges researchers face when selecting reliable laboratory reagents, built around verified antibody sourcing, pre-purchase validation, and comprehensive scientific support, with each reagent’s provenance reviewed for transparency and quality (Abmium).
For labs that lack the time or infrastructure to run a full independent-antibody comparison in-house, Independent validation services can support reproducible science by supplying data that researchers would otherwise need to generate themselves, potentially reducing wasted spending and improving project timelines. Consider this route when a target is central to a grant deliverable, when a previous antibody has already produced inconsistent results, or when you are choosing between several catalogue options and need comparative evidence before committing budget to bulk purchase.
Why transparency in validation data matters more than any single method
No single pillar, independent antibody comparison included, guarantees specificity on its own. What changes outcomes is combining methods deliberately and publishing what you find, including negative results. Too much validation data still lives in lab notebooks rather than repositories, which means the same failed antibody gets purchased and tested by a dozen different groups before anyone realises it does not work.
Standardised reporting and knockout-based platforms have made decentralised validation genuinely achievable for a typical academic lab, not just for large consortia with dedicated infrastructure. The evidence built into this piece draws on peer-reviewed validation frameworks and large-scale third-party testing efforts, and the consistent message across them is that transparency, not brand reputation, is what should determine which antibody a researcher trusts.
— Veron
How ABMIUM supports your validation workflow
Choosing a reagent without pre-purchase validation data means gambling weeks of bench time on a catalogue listing. ABMIUM removes that gamble: its catalogue combines verified antibody sourcing with transparent provenance review, so you can see how a product was characterised before it reaches your basket, not after a failed experiment.

Typical deliverables from independent validation services include documented comparisons against relevant positive and negative controls, lot-specific performance notes, and scientific support to help interpret results against specific applications such as western blot, immunofluorescence, or flow cytometry. For labs building out a broader detection workflow, ABMIUM’s catalogue also carries supporting reagents such as the Polymer-HRP Anti-Mouse/Rabbit IHC Detection System and calibrated protein markers for accurate band-size confirmation on western blot. Researchers running consensus-style comparisons may also find value in data-integrity platforms such as Qualitum when tracking multi-antibody results at scale. Browse the full ABMIUM catalogue to check whether your target already has a validated option, or get in touch to request a custom validation quote before your next order.
Sources
- Enhanced validation of antibodies for research applications
- Antibody specificity: a strong case for third-party testing (Ayoubi et al. 2023 preprint review)
- A consensus platform for antibody characterisation | Nature Protocols
- The European antibody network’s practical guide to finding and validating suitable antibodies for research
FAQ
How do you validate antibodies?
Validation combines one or more of five recognised approaches, genetic controls, orthogonal methods, independent antibody comparison, tagged protein expression, and immunocapture mass spectrometry, chosen according to what controls are feasible for your specific target.
What is the 3 and 3 rule in antibody identification?
Definitions of this rule vary by field and are not consistently applied in antibody specificity testing; if you have encountered it in a specific protocol, check that source’s own definition rather than assuming a universal standard.
What does low affinity but high avidity mean?
Affinity describes the binding strength of a single antibody-epitope interaction, while avidity describes the combined strength of multiple binding interactions, such as a polyclonal antibody engaging several epitopes at once; a reagent can bind weakly at each individual site yet still produce a strong overall signal because of multiple simultaneous contacts.
What does it mean if you test positive for an antibody?
In a research context, a positive antibody signal means the reagent detected a target in your sample under the assay conditions used, but that result only confirms true specificity once it has been checked against appropriate positive, negative, and, ideally, genetic knockout controls.