

Use Fab fragment blocking or a pre-formed primary–secondary complex, paired with a polymer detection system, to get the cleanest result from mouse on mouse IHC. Both routes work for chromogenic and fluorescent detection, and the choice between them depends on your tissue, antigen abundance, and multiplex needs. A full protocol, materials list, and troubleshooting checklist follow below.
TL;DR:
- Fab fragment blocking combined with pre-formed primary–secondary complexes reduces background more effectively than Fab alone, especially in tissues with high immunoglobulin content.
- Pre-formed complexes are recommended for low-abundance antigens in immune-rich tissues, as they prevent secondary antibodies from binding endogenous IgG before tissue application.
- Validation of reagents and kits tailored to specific tissues and targets is crucial, as performance varies widely, making small pilot tests essential before routine use.
- Imaging controls such as no-primary and isotype controls, with matched acquisition settings, are vital to confirm background reduction rather than relying solely on visual assessment.
- Immunoglobulin saturation methods are less sensitive but more specific, and tissue-specific modifications are necessary to optimize MOM IHC results across different mouse tissues.
Table of Contents
- What causes mouse on mouse IHC background?
- Which method actually reduces background, and how do you choose?
- Materials and reagents checklist for a MOM experiment
- A stepwise MOM protocol for FFPE mouse tissue
- Optimising multiplex IHC on mouse tissue
- Troubleshooting MOM artefacts you will actually see
- Where MOM approaches reach their limits
- How ABMIUM validation reduces trial-and-error in MOM workflows
- Confirming background reduction through imaging and analysis
- MOM protocols across different mouse tissue types
- Comparing commercial MOM blocking kits
- Validation and controls specific to MOM IHC
- The gap between textbook MOM advice and lab reality
- Reagents built for mouse-on-mouse work
- Sources
- FAQ
What causes mouse on mouse IHC background?
Mouse tissue is packed with endogenous immunoglobulin, sitting in serum, interstitial fluid, and resident immune cells. When you apply an anti-mouse secondary antibody to detect a mouse primary, that secondary cannot distinguish your specific primary from the tissue’s own IgG. It binds both, and it also binds Fc receptors on macrophages and other immune cells, producing signal that has nothing to do with your target.
Indirect detection makes this worse because it relies on amplification. A secondary antibody, particularly one carrying a polymer or enzyme label, generates far more signal per binding event than a directly labelled primary would. That amplification is exactly why indirect IHC is popular, and exactly why background from non-specific secondary binding becomes so visible.
Certain tissues make the problem harder to avoid:
- Spleen and lymph node, where immunoglobulin-producing plasma cells are abundant
- Tumour microenvironments infiltrated by B cells and macrophages
- FFPE sections with fixation artefacts that trap antibody in connective tissue
Which method actually reduces background, and how do you choose?
Four approaches dominate the published literature and commercial catalogues. Each solves the problem differently, and none is universally correct.
- Fab fragment blocking. Unconjugated Fab fragments of anti-mouse IgG are applied before your primary antibody, occupying the endogenous IgG and Fc receptor sites that would otherwise capture your secondary later. This method is widely cited as a robust way to remove Fc-mediated artefacts when indirect detection is unavoidable. The trade-off is an extra incubation step and the need to source a clean, well-titrated Fab reagent.
- Pre-formed primary–secondary complexes. Instead of blocking tissue IgG, you saturate the secondary antibody with your primary in a tube before it ever touches the section. A flexible mouse on mouse staining technique built on this principle prevents free secondary antibodies from finding endogenous IgG at all, because there is no free secondary left to bind. It suits both chromogenic and fluorescent workflows and tends to be the most reliable single fix when background persists after Fab blocking alone.
- Direct conjugation of primaries. Labelling your primary antibody directly with a fluorophore or enzyme removes the secondary step entirely, eliminating the mechanism that causes MOM background. Sensitivity usually drops because you lose amplification, so this suits abundant antigens rather than rare ones.
- MOM kits and polymer detection. Commercial MOM blocking kits combine a blocking step with matched biotin-free or polymer-based secondaries. Performance varies between kits and tissue types, and validation across your specific tissue and target is worth doing before routine use rather than assuming one kit suits every panel.
Pro Tip: If your antigen is low-abundance, start with a pre-formed complex rather than Fab blocking alone. Reactive blocking cleans up existing background; a proactive complex prevents it from forming in the first place, which is the more forgiving strategy when signal is already faint.
For high-abundance antigens in clean tissue, Fab blocking plus a standard polymer detection system is usually enough. For low-abundance targets in immune-rich tissue such as spleen, reach for pre-formed complexes first.
Materials and reagents checklist for a MOM experiment
Build your reagent kit around these categories before you start:
- Unconjugated Fab anti-mouse IgG for blocking, used at concentrations and incubation times documented in published protocols
- A polymer HRP detection system for chromogenic work, or a biotin-free fluorescent secondary for immunofluorescence
- Serum-free protein blocker or normal donkey/goat serum, depending on your secondary host species
- A validated mouse primary antibody with documented specificity on the tissue type you are staining
ABMIUM’s catalogue includes a polymer HRP anti-mouse/rabbit IHC detection system and an anti-mouse IgG secondary antibody suited to MOM panels, both worth checking against your specific target before you commit a full run to them.
A stepwise MOM protocol for FFPE mouse tissue
This sequence assumes standard FFPE sections and a chromogenic or fluorescent endpoint. Adjust timings for your tissue; brain, spleen, and tumour sections often need different retrieval strengths.
- Deparaffinise and rehydrate sections through xylene and graded alcohols, then perform antigen retrieval (citrate pH 6.0 or Tris-EDTA pH 9.0 depending on your target).
- Block endogenous peroxidase for 10 minutes if using chromogenic detection.
- Apply Fab fragment blocking reagent for 30 to 60 minutes at room temperature, a step documented to remove most background from endogenous mouse IgG when combined with a matched secondary.
- Option A, pre-formed complex: mix your mouse primary with the anti-mouse secondary in a separate tube for a sufficient time before applying to the section, saturating the secondary so none remains free to find tissue IgG.
- Option B, direct conjugation: apply a directly labelled primary and skip the secondary step entirely, accepting reduced amplification in exchange for zero secondary cross-reactivity.
- Incubate the primary (or complex) for 60 minutes at room temperature or overnight at 4°C, following standard IHC timing conventions.
- Wash three times in buffer, then apply detection polymer or fluorescent secondary for a short window, typically 10 to 15 minutes. Keeping secondary incubation brief is a controllable lever: prolonged exposure is a common, avoidable source of non-specific binding.
- Develop chromogen or mount for fluorescence, then image under consistent exposure settings across your experimental and control slides.
Most labs see the sharpest drop in background at step 3, since Fab blocking removes the majority of Fc-mediated signal before the primary is even applied.
Optimising multiplex IHC on mouse tissue
Sequential multiplex panels add a second layer of risk on top of MOM background: cross-reactivity between rounds and antigen loss during stripping.
- Stain low-abundance markers first, while the tissue and antigenicity are least degraded, and save robust structural markers for later rounds.
- Verify your stripping buffer empirically. Harsh stripping damages antigenicity and tissue adhesion, while mild buffers can leave antibody complexes behind; always re-stain the same marker after stripping to confirm complete removal.
- Choose retrieval buffer by antigen. Citrate pH 6.0 remains the default, but Tris-EDTA pH 9.0 improves staining for antigens such as FOXP3 where citrate under-retrieves. A partner overview of multiplex marker panel design covers similar sequencing logic for immune profiling work.
Validated multiplex workflows on FFPE mouse tissue show that immune population discrimination holds up when staining order, retrieval, and stripping are all tuned together rather than optimised in isolation.
Troubleshooting MOM artefacts you will actually see
Most MOM problems trace back to one of four causes:
- Diffuse background across the whole section: check your Fab blocking reagent’s potency and expiry, extend blocking time, and confirm your secondary dilution is not overly concentrated.
- Edge staining or granular deposits: increase wash stringency between steps and re-check whether your antigen retrieval buffer is appropriate for the target.
- Weak or absent specific signal: consider a signal amplification step, or raise your primary antibody concentration slightly before assuming the antigen is absent.
- Background that survives blocking: switch from Fab blocking alone to a pre-formed primary–secondary complex, and always run an isotype control alongside to confirm the fix worked.
Pro Tip: When background persists despite correct blocking, the secondary incubation time is worth revisiting before you change reagents entirely. Cutting a 60-minute secondary incubation to 15 minutes has resolved stubborn background in cases where the reagents themselves were not the problem.
Where MOM approaches reach their limits
Every MOM method trades sensitivity for specificity to some degree. Direct conjugation sacrifices amplification; Fab blocking and complexing add time. In tissues saturated with immunoglobulin, such as inflamed spleen, even optimised MOM protocols may underperform. When that happens, sourcing your primary from a different host species, or switching to a recombinant, thoroughly validated antibody, is often the more reliable path forward.
How ABMIUM validation reduces trial-and-error in MOM workflows
Reagent inconsistency is what turns a sound MOM protocol into weeks of repeated optimisation. ABMIUM addresses this through verified antibody sourcing, pre-purchase validation data, and independent validation services that let you see how a reagent performs before it reaches your bench. For MOM panels specifically, that means checking specificity on mouse tissue before committing a full experimental run to an untested secondary or blocking reagent.
This article draws on editorial analysis by Veron, alongside the peer-reviewed methods cited throughout. Researchers running MOM panels who want performance data on a specific antibody or detection system can request validation details directly through ABMIUM’s catalogue, rather than relying on a datasheet alone.
Confirming background reduction through imaging and analysis
A clean-looking slide under low magnification can still hide residual background at higher resolution, so verification needs to happen at the image level, not just by eye during staining.
Start with a no-primary control imaged under the same exposure and gain settings as your experimental slides. Any signal here is background by definition, whatever its source. Compare it directly against your MOM-optimised slide using identical acquisition parameters; adjusting brightness or contrast after the fact will hide real differences rather than reveal them.
For chromogenic detection, quantify staining intensity using open-source image analysis tools such as QuPath or Fiji/ImageJ, applying consistent thresholding across your control and experimental groups rather than eyeballing density. For fluorescence, measure signal-to-noise ratio between your marker-positive regions and adjacent marker-negative tissue on the same section, since background from endogenous IgG tends to be diffuse rather than compartment-specific.
A useful sanity check is comparing your MOM-optimised protocol against a standard indirect protocol on adjacent sections from the same block. If the MOM version shows a measurably tighter, more compartment-restricted signal at equivalent exposure settings, the blocking or complexing step is doing its job. If background persists in both, the issue likely sits with antigen retrieval or antibody concentration rather than the MOM strategy itself.
Document your acquisition settings (exposure time, gain, laser power for fluorescence) for every imaging session. Background reduction claims are only meaningful when compared under matched conditions, and inconsistent settings between sessions are a common reason labs think a protocol has failed when the imaging setup has simply changed.
MOM protocols across different mouse tissue types
Published and applied MOM workflows show how the same core principles adapt to very different tissue demands.
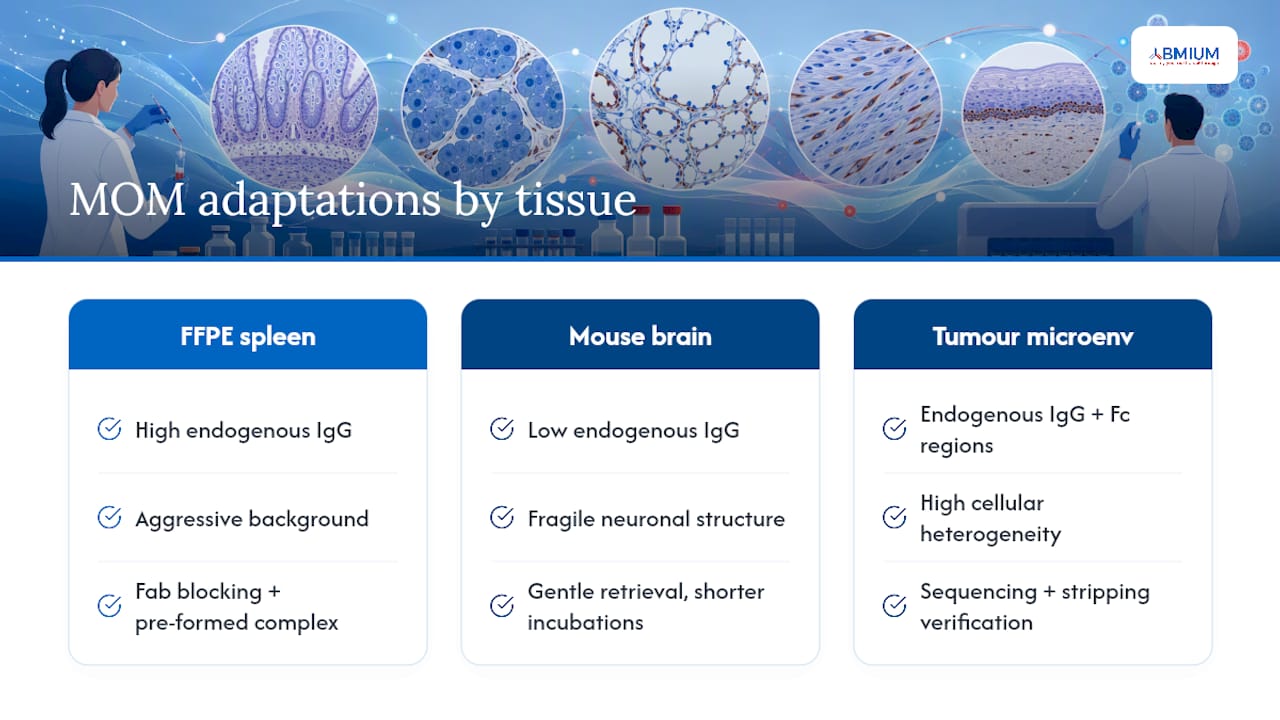
In FFPE mouse spleen, immunoglobulin-producing plasma cells make background particularly aggressive. A pre-formed primary–secondary complex approach tends to outperform Fab blocking alone here, because the sheer density of endogenous IgG can overwhelm a blocking step that only occupies binding sites temporarily. Labs staining splenic tissue for immune markers such as CD4 or CD27 often report needing both Fab blocking and complexing together to get a clean result.
Mouse brain tissue presents a different challenge: low endogenous IgG but high sensitivity to overly aggressive antigen retrieval, which can damage delicate neuronal architecture. A free-floating staining workflow for mouse brain demonstrates the need to adapt standard MOM steps, particularly retrieval strength and incubation times, to preserve tissue integrity while still controlling background from any peripheral blood contamination in vascular regions.
Tumour microenvironment tissue, especially in syngeneic mouse models, combines both problems: endogenous IgG from infiltrating B cells and macrophage-heavy regions with heavy Fc receptor expression. Multiplex panels in this tissue type benefit most from the sequencing and stripping-verification approach described earlier, since a single round of MOM blocking rarely holds up across five or six staining cycles without re-optimisation partway through.
The pattern across all three tissue types is consistent: the underlying MOM principle does not change, but the intensity of blocking and the retrieval strategy need tuning to the specific immunoglobulin load and structural fragility of the tissue in front of you.
Comparing commercial MOM blocking kits
Commercial kits bundle blocking reagent, sometimes a matched secondary, and occasionally a detection polymer into a single package. That convenience comes with trade-offs worth knowing before you standardise a lab on one kit.
| Kit type | Strengths | Limitations |
|---|---|---|
| Fab-based blocking kits | Strong track record on Fc-mediated background; flexible with existing secondaries | Extra incubation step; performance depends on Fab reagent purity |
| Pre-formed complex kits | Proactive prevention rather than reactive cleanup; suits low-abundance targets | Requires primary titration into the complex mix; less flexible for rapid antibody swaps |
| Polymer-based MOM systems | High sensitivity per binding event; fast workflows | Can amplify residual background if blocking step is skipped or rushed |
| Biotin-free detection kits | Avoids endogenous biotin interference in biotin-rich tissues (liver, kidney) | Marginally higher cost per slide than biotin-based systems |
No single kit format wins outright. Performance varies meaningfully across tissue types and target antigens, so the practical approach is running a small pilot panel, typically two or three slides per condition, before locking a kit into a routine workflow. A kit that performs beautifully on liver sections may underwhelm on lymphoid tissue simply because the immunoglobulin load differs so much between the two.
Validation and controls specific to MOM IHC
MOM protocols need a slightly different control set than standard indirect IHC, because the question is not just “does the antibody work” but “is the signal I see coming from the antibody or from endogenous IgG capture.”
Run these controls alongside every MOM experiment:
- No-primary control: tissue taken through the full protocol minus the primary antibody, revealing any background contributed by the blocking reagent, secondary, or detection system alone.
- Isotype control: a non-specific antibody of the same isotype and host species as your primary, at matched concentration, applied to a parallel section. Persistent signal here indicates Fc-mediated or non-specific binding rather than true target detection.
- Blocking-omitted control: one section run without the Fab blocking or complexing step, staining side by side with your optimised protocol. The contrast between the two directly demonstrates whether your MOM strategy is doing measurable work.
- Known positive and negative tissue: where available, a tissue type known to express your target strongly, and one known to lack it, confirming specificity independent of the MOM optimisation itself.
Isotype controls carry the same weight in MOM work as in any other IHC application: a positive isotype signal is a red flag regardless of how clean your specific staining looks, and it should be resolved before you trust the primary result. Keep the same control set consistent across every tissue type in a multiplex panel rather than reusing a single control from one round for the whole experiment.
The gap between textbook MOM advice and lab reality
Most MOM guidance still treats Fab blocking as the default answer, and it undersells how often that alone falls short in immunoglobulin-dense tissue. The peer-reviewed evidence on pre-formed complexes makes a stronger case than the fix’s popularity would suggest: treating blocking as something you do proactively, before the secondary ever meets the tissue, consistently outperforms treating it as a cleanup step applied after the fact.
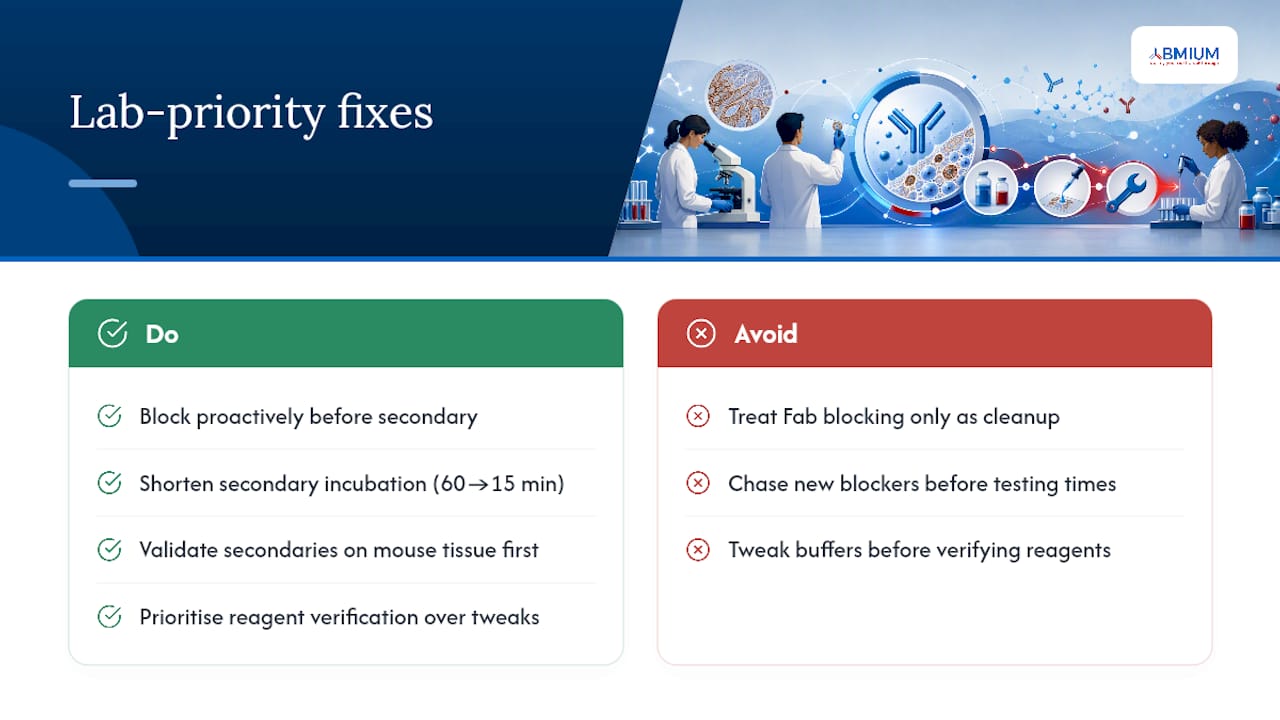
The conventional advice also underweights secondary incubation time as a variable. Labs chase new blocking reagents when a 60-minute secondary step cut to 15 minutes would have solved the problem for less money and less protocol disruption.
If there is one priority worth fixing first, it is reagent verification, not technique. A poorly characterised secondary antibody or an underperforming Fab fragment will undermine even a textbook-perfect protocol, and no amount of retrieval buffer tuning compensates for a reagent that was never validated on mouse tissue in the first place. Validate before you optimise, not after.
— Veron
Reagents built for mouse-on-mouse work
Getting MOM staining right depends on starting with reagents that were validated for mouse tissue in the first place, not discovered to be unsuitable halfway through a multiplex panel. Catalogues built around this principle include verified provenance, pre-purchase validation data, and independent testing that lets you check a secondary or detection system’s performance before committing a full experimental run to it.

For MOM panels, the polymer HRP anti-mouse/rabbit IHC detection system pairs well with Fab blocking for chromogenic workflows, and the anti-mouse IgG secondary antibody suits both pre-formed complex and standard indirect approaches. Browse the full ABMIUM catalogue to compare specifications against your target tissue, or request validation data on a specific product before you order, so your next MOM run starts with a reagent you already trust rather than one you are still testing.
Sources
- A Flexible Mouse-On-Mouse Immunohistochemical Staining Technique Adaptable to Biotin-Free Reagents, Immunofluorescence, and Multiple Antibody Staining
- Development of a Multiplex Immunohistochemistry Workflow to Investigate the Immune Microenvironment in Mouse Models of Inflammatory Bowel Disease and Colon Cancer
- Immunohistochemistry Staining Protocol for Mouse Antibody on Mouse Tissue Using Fab Fragment Anti-Mouse IgG - IHC WORLD
- Improved multiplex immunohistochemistry for immune microenvironment evaluation of mouse formalin-fixed, paraffin-embedded tissues
FAQ
What is the fastest fix for mouse on mouse IHC background?
Fab fragment blocking applied before your primary antibody removes most Fc-mediated background quickly, and pairing it with a short secondary incubation of 10 to 15 minutes further limits non-specific binding.
Do pre-formed complexes work for fluorescent detection?
Yes, pre-formed primary–secondary complexes work for both chromogenic and immunofluorescent MOM protocols, since the mechanism, saturating the secondary before tissue contact, does not depend on the detection label.
Which antigen retrieval buffer works best for mouse tissue?
Citrate pH 6.0 suits most standard targets, but Tris-EDTA pH 9.0 improves retrieval for antigens such as FOXP3 where citrate underperforms, so testing both on a pilot slide is worthwhile for new panels.
How do I know if my MOM protocol has actually worked?
Compare a no-primary control and an isotype control against your optimised slide under identical imaging settings. Persistent signal in either control means background remains, regardless of how clean the specific staining appears.
Should I validate a MOM blocking kit before routine use?
Yes, kit performance varies across tissue types and primary antibody targets, so a small pilot panel on your specific tissue is worth running before adopting any kit lab-wide. Reagents validated through a service such as ABMIUM’s reduce that pilot burden by providing performance data ahead of purchase.