

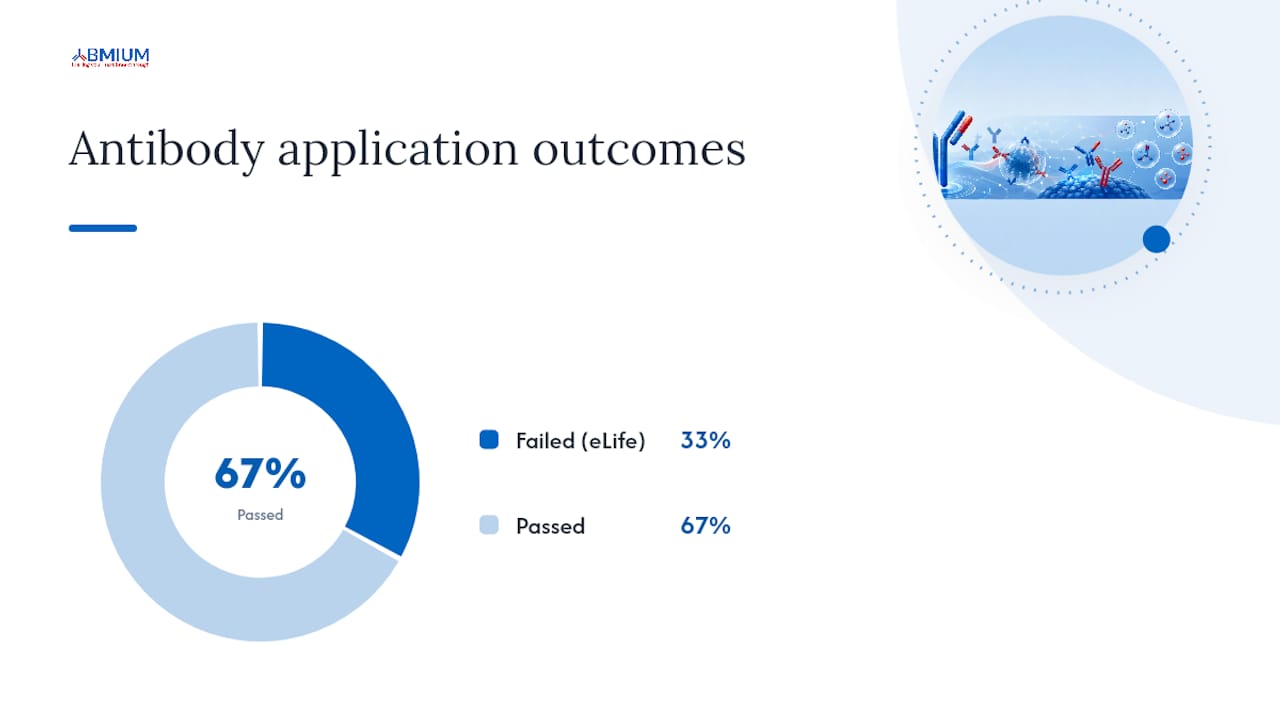
Run a genetic negative control, an orthogonal assay, and an application-specific biochemical test before you trust any antibody in your workflow. That is the minimum viable panel. Skip any one of these three and you are relying on faith rather than data, and the numbers on manufacturer claims do not inspire much faith: a third-party evaluation of 614 commercial antibodies found that approximately one-third recognised their intended target in the applications for which they were sold, according to about a third recognised their intended target.
The practical first-line tests, depending on what you have available, look like this:
- Knockout or knockdown of the target gene, checked against wild type
- Western blot or ELISA, matched to your intended downstream application
- An orthogonal method such as mass spectrometry, or a second antibody raised against a different epitope
Community guidance from resources following IWGAV-aligned principles treats this combination as the baseline for defensible specificity claims, not an optional extra. Independent verification services, including those offered through ABMIUM, exist precisely because internal labs often lack the time or genetic tools to run a full panel themselves.
Pro Tip: Run the minimal panel first, then move to the method-specific protocols later in this guide. A failed genetic control saves you weeks of chasing a false lead in downstream experiments.
Key Takeaways
Reliable antibody specificity testing requires a genetic negative control, an orthogonal assay, and an application-specific biochemical test run together, not any single method alone.
| Point | Details |
|---|---|
| Run the minimum panel first | Combine a genetic knockout, an orthogonal method, and an application-specific test before trusting any antibody. |
| Specificity is context-dependent | Validate separately for each application, since fixation, matrix, and conformation all change apparent specificity. |
| Avoid preadsorption as sole proof | Peptide-blocking tests routinely pass by design for monoclonal and affinity-purified antibodies. |
| Document everything at the bench | Record lot numbers, RRIDs, dilutions, and raw images as you go, not retrospectively. |
| Consider independent validation | ABMIUM offers verified reagents and independent validation services for high-stakes or resource-limited projects. |
Table of Contents
- What is antibody specificity testing and why does it depend on the assay?
- What should be in a core antibody validation checklist?
- How do you validate specificity with molecular and biochemical methods?
- How do you validate antibodies for IHC, immunofluorescence and flow cytometry?
- What controls and titrations belong in every validation experiment?
- How do you interpret validation results and decide pass or fail?
- What should you document to keep results reproducible?
- When should you commission independent antibody validation?
- What are the most common antibody validation pitfalls?
- A note on building a validation-first culture
- How ABMIUM supports validated antibody selection
- Sources
- FAQ
What is antibody specificity testing and why does it depend on the assay?
Antibody specificity testing establishes whether an antibody binds only its intended target, and not related proteins, in the exact experimental context you plan to use it. That last clause matters more than most researchers assume. Specificity is not a fixed property printed on a datasheet. It shifts with epitope availability, protein conformation, and whatever matrix the antibody meets, whether that is a denaturing gel, a fixed tissue section, or live cells in suspension.
This is where the language gets confused. Specificity describes an antibody’s ability to bind a single target without cross-reacting with others. Selectivity is closely related but often used to describe performance across a panel of related molecules, such as distinguishing one cytokine family member from its close relatives. Sensitivity is a separate axis entirely: it measures how much target the antibody can detect, not whether what it detects is correct. An antibody can be highly sensitive and poorly specific at the same time, which is exactly the trap that catches labs relying on signal strength alone as proof of validity.
Reviews of Western blot validation practice describe specificity and selectivity as highly assay- and sample-dependent, which is why an antibody validated for one application cannot be assumed to work in another without independent testing.
- Native versus denatured protein can expose or hide the same epitope
- Fixation chemistry alters conformation in ways a Western blot never reveals
- Paralogous proteins can share epitopes closely enough to fool a single antibody
Pro Tip: A single clean band on a Western blot tells you almost nothing about specificity in a fixed tissue section. Treat every application as a separate validation question.
What should be in a core antibody validation checklist?
A ranked checklist keeps validation manageable instead of overwhelming, and it gives you a defensible order of operations when time or reagent supply is limited.
- Genetic negative control — a knockout or knockdown of the target gene, run in the same system you intend to use the antibody in.
- Orthogonal method — mass spectrometry, RNA-protein correlation, or a second antibody against a distinct epitope.
- Application-specific biochemical test — Western blot for lysate work, ELISA for quantitative solution assays, flow cytometry or IHC for cellular and tissue contexts.
- Multiple cell or tissue panels — testing across at least two biologically distinct sources to rule out sample-specific artefacts.
- Titration series — establishing a working concentration rather than using the manufacturer’s suggested dilution blind.
- Documentation — catalogue number, lot number, and raw image files retained from the outset, not reconstructed after the fact.
Quick pass and fail logic follows from step one and two together. Signal loss in the genetic knockout, confirmed by an orthogonal method, is a strong pass. A persistent signal in the knockout, with no orthogonal support explaining it, is a fail, full stop. Partial signal loss needs a second look before you draw conclusions either way.
On timeline: labs with access to CRISPR knockout lines and standard imaging equipment can typically complete a structured validation protocol within a project cycle measured in weeks rather than months, according to timing and feasibility notes in Nature Protocols’ work on knockout-based characterisation platforms. Budget accordingly. Rushed validation is usually the difference between a reagent that works and one that quietly derails a project six months later.

How do you validate specificity with molecular and biochemical methods?
Each biochemical method carries its own protocol requirements and its own way of lying to you if you are not careful.
-
Western blot. Run lysate from a wild-type sample alongside a genetic knockout or knockdown in the same lane format. A credible result shows a single band at the predicted molecular weight that disappears in the knockout lane. Caveat: overexpression systems can mask off-target binding by flooding the blot with correct-size signal, so pair overexpression controls with endogenous-level samples wherever possible.
-
ELISA. Validate specificity with a dilution series against purified target protein and a panel of structurally related off-target proteins. A specific antibody shows a clean dose-response curve against the true target and flat, near-background response against the panel. Cross-reactivity here often shows up only at high antibody concentrations, so test across a wide range, not one dilution.
-
Immunoprecipitation. Confirm the pulled-down protein by mass spectrometry rather than by band size alone. IP followed only by a second Western blot with the same antibody is circular evidence, not confirmation.
-
Mass spectrometry. Use this as your orthogonal gold standard. A credible result lists the intended target among the top peptide hits by abundance, not buried in a long list of nonspecific binders. Epitope-mapping and competition assays are standard companion techniques for defining exactly where an antibody binds and whether that site overlaps with related family members.
-
Surface plasmon resonance. Useful for affinity and kinetic data, particularly when comparing candidate antibodies against a panel of related antigens to rank cross-reactivity risk quantitatively.
Peptide-blocking behaviour deserves a specific caution here rather than blanket trust. A single clean band on a blot can represent a mixture of co-migrating proteins, not confirmation of one target, which is exactly why pairing biochemical results with genetic and orthogonal evidence matters so much.
Pro Tip: Use tagged recombinant protein as a positive control whenever available. A calibrated protein marker alongside your samples makes band-size interpretation far less ambiguous, especially for targets that run close to common contaminants.
A third of tested antibodies fail their marketed application, according to the eLife third-party evaluation of 614 commercial reagents, which is the strongest argument for running your own biochemical checks rather than trusting a datasheet outright.
How do you validate antibodies for IHC, immunofluorescence and flow cytometry?
Cellular and tissue-based validation introduces variables biochemistry alone never sees: fixation chemistry, antigen accessibility, and autofluorescence.
- Antigen retrieval. Test at least two retrieval conditions (heat-induced epitope retrieval versus enzymatic) before concluding an antibody fails on tissue, since fixation can bury an otherwise valid epitope.
- Species and tissue matching. Confirm the antibody’s target sequence is conserved in your species and expressed in the tissue you are staining, not just listed generically on the datasheet.
- Isotype controls. Run a matched isotype at the same concentration to establish the non-specific binding floor for your tissue or cell type.
- Secondary-only controls. Essential for ruling out autofluorescence or endogenous peroxidase activity, particularly in tissues with high background like liver or kidney.
- Genetic or transfection controls. A knockout tissue section or an overexpression transfection gives the strongest positive and negative comparison available for imaging work.
Masked epitopes after fixation are one of the most common false negatives in IHC. Before concluding an antibody does not work, try an alternative retrieval buffer, a longer incubation, or a different fixative altogether. Non-specific background staining is often a blocking problem rather than an antibody problem, so increase blocking serum concentration or extend blocking time before you discard a reagent.
A validated detection system paired with a well-characterised secondary reduces one entire variable from your troubleshooting list. To reach a final specificity decision, integrate the imaging result with whatever biochemical or genetic evidence you already have. A clean IHC pattern that matches known tissue expression, backed by a Western blot showing the correct band size in the same tissue, is a far stronger case than either result alone.
Pro Tip: Photograph negative controls at the same exposure settings as your experimental images, every time. Reviewers and your future self will ask for this comparison, and reconstructing it later from memory never works.
What controls and titrations belong in every validation experiment?
A validation experiment is only as good as the controls surrounding it. Miss one, and the result becomes uninterpretable no matter how clean the primary signal looks.
- Genetic negative control — knockout or knockdown, matched to the exact system used in the experimental condition.
- Positive control — a sample known to express the target at a defined level, ideally from a separate biological source than your test samples.
- Isotype control — matched species and immunoglobulin class, run at the same concentration as the primary antibody.
- Secondary-only control — antibody diluent and secondary alone, no primary, to establish background from the detection system itself.
- Pre-adsorption or peptide-blocking — informative for polyclonal antibodies, but largely uninformative for monoclonal or affinity-purified reagents, since those are selected to bind the immunogen and will pass by design regardless of true specificity elsewhere.
- Biological replicates — a minimum of three independent samples, not three technical repeats of one lysate.
For titration, start broad. A typical Western blot series might run 1:500, 1:1,000, 1:2,000 and 1:5,000, watching for the concentration where target signal remains strong while background drops away. For IHC, start at the manufacturer’s suggested dilution and test one step more concentrated and one step more dilute before locking in a working concentration.
Two example designs illustrate control placement clearly:
- Western blot validation. Lanes run wild-type lysate, knockout lysate, a positive control (recombinant protein or overexpression lysate), and a loading control such as a housekeeping protein, all probed on the same membrane under identical conditions.
- IHC/IF validation. Serial tissue sections run experimental antibody on wild-type tissue, experimental antibody on knockout tissue, isotype control on wild-type tissue, and secondary-only on wild-type tissue, all imaged at matched exposure.
How do you interpret validation results and decide pass or fail?
Convert raw validation data into a decision using a small number of consistent rules, applied the same way every time regardless of how promising a result looks at first glance.
Pass: genetic knockout shows signal loss, and an orthogonal method (mass spectrometry, or a second antibody against a different epitope) confirms the same finding independently. This is the strongest possible outcome and supports full confidence in the application tested.
Fail: signal persists in the genetic knockout with no orthogonal evidence explaining the discrepancy. Treat this as a fail even if the biochemical result looks clean elsewhere, since a persistent knockout signal usually means cross-reactivity or a genuinely nonspecific antibody.
Conditional pass: knockout loss observed only in an overexpression system, without confirmation at endogenous expression levels. Document this as application-restricted, note the caveat explicitly in your methods, and avoid extrapolating the result to lower-abundance contexts without further testing.
- A single clean band matching predicted molecular weight, with knockout loss confirmed: strong evidence, proceed with confidence.
- Multiple bands, one matching predicted size: investigate further before use; the extra bands may be splice variants, degradation products, or genuine cross-reactivity.
- Knockout loss seen only in transfected cells: usable for overexpression-based experiments, not yet validated for endogenous detection.
Pro Tip: Write your conditional approvals down at the time you make them. A validation decision that felt obvious in the moment is much harder to reconstruct accurately six months later when a reviewer asks for justification.
What should you document to keep results reproducible?
Reproducibility depends on documentation habits formed at the bench, not reconstructed retrospectively for a manuscript. A publication-ready record includes the antibody catalogue number, lot number, and RRID where one is assigned, alongside full dilution, incubation time, and temperature conditions for every application tested.
- Sample source, species, and genotype for every experimental and control condition
- Raw, unprocessed image files and blot scans, archived alongside any cropped or adjusted versions used in figures
- Instrument settings, including exposure times for imaging and antibody lot numbers matched to specific experiment dates
- A written methods description detailed enough that another lab could repeat the exact protocol without contacting you
| Element | Why it matters |
|---|---|
| Lot number | Antibody performance can shift between production lots, even under the same catalogue number |
| RRID | Allows other researchers and journals to trace the exact reagent used, independent of vendor naming changes |
| Raw image files | Prevents disputes over processing artefacts and supports re-analysis if a claim is later questioned |
| Dilution and incubation conditions | Enables direct replication without guessing at unstated parameters |
Independent, deposited validation datasets strengthen any specificity claim considerably more than a citation count ever could. A well-documented product page showing lot-specific application notes gives you a template worth matching in your own records.
When should you commission independent antibody validation?
Independent validation earns its cost in specific, identifiable situations rather than as a blanket recommendation for every experiment.
- The experiment feeds a high-stakes publication claim, where a specificity failure discovered post-publication is expensive to retract
- The work supports a clinical or translational pipeline, where downstream decisions depend on reagent reliability
- Internal resources lack access to genetic knockout lines, mass spectrometry, or the staff time to run a full panel properly
- A large or costly project depends on one antibody performing correctly across many samples
A third of commercial antibodies fail their marketed application, according to a third-party evaluation of 614 reagents, and that figure is precisely why independent validation platforms exist as a corrective to manufacturer claims rather than a duplicate check on work already done well.
Independent validation services typically bundle a genetic knockout panel, an orthogonal assay such as mass spectrometry, and application-specific testing matched to your intended use, whether that is Western blot, flow cytometry, or IHC. Engagement usually starts with a scoping conversation about your target, species, and application, followed by a structured testing timeline and a written report you can cite directly in methods sections.
ABMIUM runs this kind of verification alongside its catalogue of pre-validated reagents, giving researchers a route to independent confirmation without building an entire validation pipeline from scratch. Reviewing ABMIUM’s product listings shows the level of provenance detail that a properly validated antibody datasheet should carry, including lot numbers, application notes, and documented testing.
What are the most common antibody validation pitfalls?
Even a well-designed validation plan runs into predictable trouble spots, and knowing the fix in advance saves a lot of wasted bench time.
- Epitope masking after fixation. The antibody works on a blot but fails on tissue. Try an alternative antigen retrieval method, extended retrieval time, or a different fixative before concluding the antibody itself is faulty.
- Cross-reactivity to family members. Common in antibodies targeting proteins with close paralogues. Test against a purified panel of related proteins, or switch to an antibody targeting a less conserved epitope region.
- Over-reliance on manufacturer datasheets. Datasheets reflect the conditions the manufacturer tested, not necessarily yours. Treat every datasheet claim as a starting hypothesis, not a guarantee.
- Preadsorption tests on monoclonals. These routinely pass by design for monoclonal and affinity-purified antibodies, so do not treat a passed peptide-block test as meaningful specificity evidence for those reagent types.
Pro Tip: When a validation result stays ambiguous after one round of troubleshooting, escalate methodically: repeat internally with fresh reagent first, add a second orthogonal method next, and only then consider third-party validation. Skipping straight to outside testing without ruling out a bad reagent lot wastes both time and budget.
A note on building a validation-first culture
Routine validation feels like friction until the first time it saves a project from months of chasing a phantom result. Labs that treat the core validation panel as a standing requirement, not a special step reserved for high-stakes papers, build a quiet kind of credibility. Reviewers notice. Collaborators notice. Adopt the panel as standard practice, not an exception.
How ABMIUM supports validated antibody selection
Choosing a reagent without transparent provenance is a gamble every time, and researchers rarely have the spare weeks to discover a failed antibody after the experiment is already running. ABMIUM addresses that gap directly with a catalogue built around verified sourcing and pre-purchase validation data, so the decision happens before the order, not after a wasted month of troubleshooting.
Browsing the ABMIUM catalogue gives you access to primary antibodies, secondary antibodies, ELISA kits, and detection consumables with lot-level documentation attached. Beyond the catalogue, ABMIUM offers:
- A verified antibody and reagent catalogue with transparent provenance and application notes
- Independent validation services covering genetic controls, orthogonal assays, and application-specific testing
- Expert scientific support for comparing antibody options before you commit budget
- Institutional and bulk purchasing arrangements for labs managing larger reagent programmes
If your current antibody has never been through a genetic knockout comparison, or you are choosing between several candidates for a new target, request a validation quote or a detailed datasheet through ABMIUM’s product catalogue before your next order goes in.
Sources
The validation logic in this guide draws on peer-reviewed methodology reviews and third-party testing data rather than manufacturer claims alone.
- Antibody specificity: A strong case for third-party testing | eLife
- Antibody validation for Western blot: By the user, for the user - PMC
- Characterizing antibodies (CSH Protocols)
- Nature Protocols article on knockout-based characterisation platforms
Consult the original papers directly for full protocol steps and raw datasets before designing your own validation experiments.
FAQ
How do you test the specificity of an antibody?
Run a genetic knockout or knockdown alongside an orthogonal method such as mass spectrometry, then confirm with an application-specific biochemical test like Western blot, ELISA, or IHC matched to your intended use.
What is antibody specificity?
Antibody specificity is the ability of an antibody to bind only its intended target without cross-reacting with related proteins, and it depends heavily on the sample matrix and assay conditions rather than being a fixed property.
What is the 3 and 3 rule in antibody identification?
Definitions of this rule vary by field and are not consistently applied in antibody validation literature, so it is safer to rely on the documented genetic-control-plus-orthogonal-method approach covered throughout this guide.
What can an antibody test tell you?
A validation test tells you whether an antibody reliably detects its intended target in a specific application and sample type, and it can reveal cross-reactivity, background binding, or application-specific failure that a datasheet alone would never show. Services like those offered through ABMIUM extend this by providing independent confirmation using genetic and orthogonal methods.