

Flow cytometry antibody validation proves an antibody is specific, selective and reproducible under the exact conditions of your assay, not under generic manufacturer claims. That requires genetic or orthogonal controls to confirm target specificity, an 8 to 12 point titration to fix the working concentration, and documented performance metrics that hold up across lots and operators. Skip any one pillar and the data may look clean while quietly being wrong. The protocol below walks through each step in the order you should actually run it.
TL;DR:
- Validating flow cytometry antibodies requires application-specific testing, including a positive and negative control, titration curve, and orthogonal evidence, to ensure reproducibility and accuracy.
- Genetic knockouts, transfectant systems, and independent clone comparisons are the gold standards for confirming antibody specificity, especially when used together for stronger validation.
- Titration using an 8 to 12 point series on actual assay conditions identifies the optimal concentration at the curve plateau, preventing false positives or negatives caused by incorrect antibody levels.
- Proper controls, such as FMO and biological negatives, along with documented instrument settings and gating strategies, are essential for reproducible and reliable flow cytometry data.
- Sourcing antibodies with documented provenance and considering independent validation services reduces troubleshooting time and increases confidence in experimental results.
Table of Contents
- What does flow cytometry antibody validation actually mean?
- How do you prove antibody specificity in flow cytometry?
- Titration and panel optimisation: getting the concentration right
- Controls and performance metrics: LOB, LLOQ and precision
- A step-by-step antibody validation protocol you can run this week
- Reporting standards: what to document and where to archive it
- How does ABMIUM support flow cytometry antibody validation?
- Why fit-for-purpose validation beats the generic checklist
- Source antibodies with the provenance already documented
- Sources
- FAQ
What does flow cytometry antibody validation actually mean?
Validation is not a certificate a vendor hands you. It is proof, generated in your hands, that a given antibody clone binds its intended target in your cell type, at your concentration, under your fixation and staining conditions, and does so again next week with a different lot.
Three properties matter, and researchers routinely conflate them.
Specificity describes whether the antibody binds only its intended epitope, and nothing else, on a given cell. Selectivity describes whether it can distinguish that target from closely related family members (think CD4 isoforms, or KIR receptors that share near identical extracellular domains). Sensitivity describes whether the antibody detects the target at physiologically relevant expression levels, particularly important for dim markers like intracellular cytokines or low density surface receptors.
An antibody can be exquisitely specific for its epitope and still fail your experiment because the conjugate is too dim to separate positive from negative populations, or because the epitope sits in a region masked by fixation and permeabilisation. This is why validation must be application specific: an antibody proven for Western blot or immunohistochemistry tells you almost nothing about how it will behave in a live cell suspension analysed on a cytometer, because the epitope’s conformational state, accessibility and the required affinity threshold differ substantially between those platforms.
Clone identity drives most of the variability researchers actually see. The same target antigen recognised by two different clones, say two anti CD3 antibodies raised against different epitopes, can produce staining patterns that look nothing alike on the same sample. Conjugate choice compounds this: a fluorochrome with poor brightness on a dim target will underperform regardless of how specific the underlying clone is, and tandem dyes degrade with light exposure and storage in ways that mimic a genuine loss of antibody performance.
Lot to lot variability is the quiet failure mode most labs underestimate. Two vials of the “same” antibody, purchased months apart, can carry different antibody to fluorophore ratios, different aggregate content, or subtly different affinity if the immunogen batch shifted. This is why serious reviews of flow cytometry antibody validation argue that manufacturers and end users share responsibility for demonstrating reactivity with the endogenous target, not just the recombinant protein used in an ELISA screen.
Before you accept any antibody into a working panel, reviewers and careful colleagues will expect to see:
- A positive population and a matched negative population (a knockout, a biologically negative cell type, or an isotype matched control run in parallel).
- A titration curve, not a single concentration pulled from a datasheet.
- At least one orthogonal line of evidence, such as correlation with mRNA expression or a second antibody clone against a different epitope on the same target.
- Documentation of clone, catalogue number, lot and conjugate, tied to the specific experiment.
None of this is exotic. It is simply more rigour than pulling a vial off the shelf and running it once.
How do you prove antibody specificity in flow cytometry?
Four experimental approaches dominate specificity testing, and the strongest validation files combine at least two of them rather than leaning on a single method.
Genetic knockout and knockdown controls are the gold standard where available. A CRISPR knockout cell line, or an siRNA knockdown, removes the target protein entirely (or substantially) and lets you ask a direct question: does staining disappear? If your antibody still lights up a CD19 knockout cell line at the same intensity as wild type, the signal is not coming from CD19. The caveat is practical rather than conceptual: knockouts are expensive to generate or source for every target, knockdown is rarely complete, and residual protein can leave a faint true positive signal that gets misread as background.
Overexpression and transfectant systems work in the opposite direction. Transfecting a null background cell line with the target gene creates an artificial positive population you can compare against untransfected parental cells. This is fast and reproducible, but it comes with a real caveat: overexpression can drive antigen density far beyond physiological levels, which can mask affinity problems that would matter at endogenous expression. An antibody that looks perfectly specific against a wildly overexpressed target may still perform poorly on cells expressing the receptor at native, much lower density.
Independent antibodies against a different epitope on the same target provide a form of internal cross-check that does not require any genetic engineering. If two structurally unrelated clones, raised against different regions of the same protein, produce concordant staining patterns on the same sample, that convergence is meaningful evidence of true specificity. This is one of the core validation pillars recommended by antibody validation working groups, alongside genetic controls and orthogonal data correlation. For well characterised surface markers, prioritise clones that carry Human Leukocyte Differentiation Antigen (HLDA) workshop approval. HLDA-approved clones have been benchmarked against reference panels across multiple independent laboratories, which makes them a more defensible reference standard than an unvetted clone with a single manufacturer’s internal data behind it.
Orthogonal method correlation rounds out the picture by comparing flow cytometry results against an entirely different technology, such as mass spectrometry based proteomics, RNA sequencing, or a validated ELISA. Concordance across platforms that use completely different physics and chemistry is hard to explain away as an artefact.
| Method | Strength | Main limitation |
|---|---|---|
| Genetic knockout/knockdown | Direct causal proof of specificity | Not available for every target; knockdown may be incomplete |
| Overexpression/transfectants | Fast, reproducible positive control | Antigen density often unphysiological |
| Independent antibody clones | No genetic engineering required | Both clones could share a rare off-target epitope |
| Orthogonal method correlation | Cross-platform confirmation | Correlation, not proof of mechanism |
Pro Tip: When you cannot get a knockout, pair an independent antibody against a distinct epitope with a biologically negative cell population you already have in the freezer, such as a cell line known not to express the target. Two lines of weaker evidence, combined, often beat one expensive but singular knockout experiment.
Choosing how many of these methods to run is genuinely a judgement call, and this is where fit-for-purpose validation earns its place as the governing principle rather than an afterthought. A limited exploratory experiment screening a new marker in a pilot study warrants less validation depth than a biomarker that will feed into a clinical decision or a published dataset others will build on. Matching validation rigour to downstream risk, rather than applying one fixed checklist to every antibody regardless of stakes, is what separates efficient labs from ones that either over-validate trivial questions or under-validate consequential ones.
Titration and panel optimisation: getting the concentration right
Titration is not optional fine tuning. It is the single most consequential step in flow cytometry antibody validation, because using the wrong concentration can manufacture a specificity problem that does not actually exist, or mask a real one.
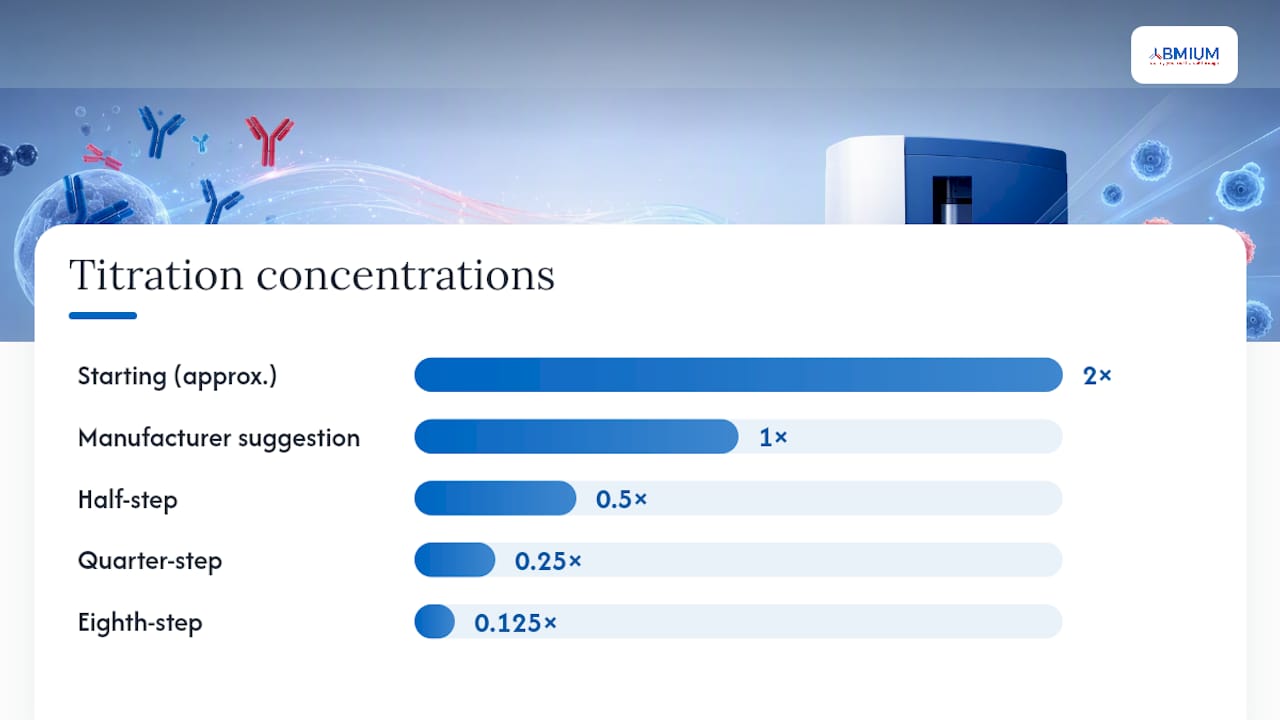
Run an 8 to 12 point titration series, halving the antibody concentration at each step from a starting point roughly double the manufacturer’s suggested amount down through a range that clearly overshoots into saturation and undershoots into background territory.
- Prepare your titration series in the exact staining buffer, cell concentration and tube format you will use in the final assay, not a simplified proxy.
- Stain matched aliquots of your actual target cell population at each concentration, alongside a true negative control at each point.
- Acquire all tubes on the same instrument session with identical voltage settings.
- Calculate the stain index at each concentration: the difference between the median fluorescence of the positive and negative populations, divided by twice the standard deviation of the negative population.
- Plot stain index against antibody concentration. The curve typically rises, plateaus, then either holds flat or declines at very high concentrations due to non-specific binding.
- Select your working concentration at the point where the curve first plateaus, not at the peak and not further up the curve.
Choosing a concentration past the plateau wastes reagent and increases background without improving separation. Choosing one before the plateau leaves signal on the table and can produce false negative calls on dimly expressing cells.
Titration must mirror final assay conditions in every respect that could plausibly affect binding kinetics: the same cell number per tube, the same staining volume, the same blocking step (Fc receptor block matters enormously for myeloid populations), and the same fixation and permeabilisation protocol if your final panel includes intracellular targets. A titration run on unfixed cells tells you very little about the concentration you need once you have pushed those same cells through paraformaldehyde fixation and saponin permeabilisation, because fixation can alter epitope accessibility and nonspecific binding behaviour substantially.
Tandem dyes deserve particular caution. Fluorochromes like PE-Cy7 or APC-Cy7 degrade with light exposure, freeze-thaw cycling and prolonged storage, and that degradation shows up as a drifting apparent titre rather than an obvious antibody failure. Lot to lot differences in tandem conjugates can shift the optimal titration meaningfully enough that a concentration validated six months ago is no longer correct today. Re-titrate whenever you receive a new lot, whenever a tandem reagent has been in active use for more than a few months, and whenever you change instrument or detector configuration, since PMT voltage and laser alignment both affect where the plateau sits.
Instrument settings compound with titration in ways that catch people out. Detector voltage set too low compresses your dynamic range and can make an under-titrated antibody look adequate; too high pushes your positive population off scale and clips the very separation you are trying to measure. Always confirm voltages against a standardised bead set before running or interpreting a titration series, and keep those settings recorded alongside the titration data itself.
Controls and performance metrics: LOB, LLOQ and precision
A titrated, specificity-confirmed antibody still needs a performance envelope, the numeric boundaries within which its results can be trusted.
The limit of blank (LOB) is the highest apparent signal you would expect to see when the true target is absent, established by running multiple replicates of a genuinely negative sample and characterising the noise floor. The lower limit of quantification (LLOQ) sits above the LOB and marks the lowest concentration or frequency of positive cells your assay can measure with acceptable precision, typically defined by running dilution series of a known positive sample down toward the noise floor and finding where coefficient of variation exceeds your acceptance threshold. CLSI H62 sets out practical strategies for estimating both in cell based assays, alongside instrument qualification steps that most academic labs skip entirely but that matter considerably when results need to hold up to external scrutiny.
Choosing the right negative control matters as much as running one at all, and the three common options answer different questions:
- Isotype controls match the primary antibody’s species, isotype and conjugate but carry no relevant specificity, useful for flagging Fc receptor mediated nonspecific binding.
- Fluorescence minus one (FMO) controls include every reagent in your panel except the one being evaluated, and are the correct choice for setting gates in any multicolour panel because they account for spillover from every other fluorochrome present.
- Biological negative populations, a cell type or genetic knockout genuinely lacking the target, give the cleanest read on true specificity but are not always available for every marker.
Isotype controls answer “does this antibody bind nonspecifically through its Fc region or isotype”, while FMO controls answer “where does my gate belong given spillover from the rest of the panel”. Using an isotype control where an FMO is required, or vice versa, is one of the most common gating errors reviewers flag in submitted flow data.
On replicate numbers and precision targets, practice guidelines for cell based fluorescence assays recommend running enough technical replicates to characterise assay variability properly rather than relying on a single tube, with a commonly cited acceptance target of coefficient of variation under 10% for abundant, well separated populations. Rare populations, below roughly 0.1% of the parent gate, will show wider CVs simply due to cell counting statistics, and that widened variability needs to be reported honestly rather than papered over. Where you need true quantitation rather than a relative frequency, fluorescence calibration beads let you convert intensity into molecules of equivalent soluble fluorochrome (MESF) units; where that level of rigour is not required, report frequencies plainly and state the assay’s known limits rather than implying a precision you have not demonstrated.
A step-by-step antibody validation protocol you can run this week
This sequence takes a new antibody from vial to validated reagent, in the order that avoids wasted reagent and false conclusions.
- Record pre-experiment metadata before opening the vial. Clone name, catalogue number, lot number, conjugate, host species, storage temperature and expiry date. A product page that documents this clearly, such as ABMIUM’s HLA-DQ clone 1A3 listing, is exactly the format your own notebook entry should mirror.
- Select your validation cell system. A genuinely negative population, a positive control population with known expression, and if possible a genetic knockout or independent clone for cross-checking.
- Determine cell numbers and staining medium. Standard flow staining protocols use roughly 1 to 5 x 10^5 cells per tube in a phosphate buffered saline based staining buffer with 1 to 2% protein carrier and 2mM EDTA to prevent clumping. Match this to whatever your production assay actually uses.
- Run the titration series described in the section above, using the same cells, volume and staining time you intend to use in the final assay.
- Include your controls in the same run: isotype or FMO as appropriate, plus a biological negative or knockout if available, at your chosen working concentration.
- Acquire on a properly qualified instrument, with voltages set against calibration beads and compensation set using single stained controls, not the full multicolour panel.
- Gate conservatively. Start with a broad live/dead and singlet gate, then apply lineage gates, then evaluate your target marker last, referencing your FMO for gate placement.
- Calculate acceptance criteria before you interpret the result: stain index at plateau, CV across replicates, and separation from your negative control expressed as a fold change or stain index value, not a subjective “looks positive” call.
- Repeat with a second lot if the antibody will be used across an extended study, to confirm the concentration and gating strategy hold.
Common failure modes worth troubleshooting systematically: a titration curve with no plateau usually means your top concentration was not high enough; a positive population that will not separate from negative despite high concentration often points to a dim conjugate rather than a specificity problem; and a result that validates in one lab but fails to reproduce in another frequently traces back to fixation protocol differences rather than the antibody itself.
Pro Tip: Photograph or scan your gating strategy and titration plots the same day you generate them, and file them against the lot number, not just the antibody name. Six months later, when a colleague asks why a panel stopped working, the lot number is usually the answer, and you will not remember which plot belongs to which vial otherwise.
Reporting standards: what to document and where to archive it
Validation that lives only in your head is not reproducible, and a surprising number of published flow cytometry papers cannot be replicated because the methods section omits exactly the details that determined the result.
The MiFlowCyt reporting checklist exists to close that gap, and the fields that matter most in practice are:
- Full antibody identity: clone, catalogue number, lot, conjugate, manufacturer.
- Titration data showing the concentration selected and the reasoning behind it.
- Instrument configuration: cytometer model, laser and filter configuration, voltage settings.
- Complete gating strategy, ideally as an exported gating tree, not a text description.
- Sample preparation details, including fixation and permeabilisation reagents and timing.
Archive raw FCS files and gating templates rather than only summary statistics, since a reviewer or collaborator who wants to reproduce your gating decisions needs the primary data, not your conclusions about it. Public repositories built for cytometry data give other researchers a place to check your work independently. Negative results deserve the same documentation discipline as positive ones. An antibody that failed validation, and the specific reason it failed (no plateau, poor stain index, discordance with an independent clone) is genuinely useful information that saves the next researcher from repeating the same dead end.
How does ABMIUM support flow cytometry antibody validation?
Validation depends on knowing exactly what you are starting with, and that is where sourcing quietly determines how much validation work lies ahead of you. ABMIUM approaches this from the supply side: every antibody in the catalogue carries documented provenance, meaning the clone identity, lot history and conjugate details are recorded and reviewed before the product ever reaches a listing.
Product pages record the same metadata your MiFlowCyt reporting will eventually need anyway, clone designation, catalogue number, host species and conjugate, in the format shown on listings such as the CD19 clone HD37 page or the HLA-G clone 87G page. That saves the step of chasing a vendor’s technical support line for details that should have been on the listing from the start.
Where a lab needs more than sourcing, ABMIUM’s independent validation services commission the specificity and titration work described throughout this article on a fee basis, which matters most when a target lacks an obvious knockout line or when a study’s downstream stakes justify a documented, third-party validation file rather than an internal one.
| Validation step | Where ABMIUM fits |
|---|---|
| Clone and lot documentation | Provenance recorded on the product page before purchase |
| Titration and specificity testing | Available as a commissioned independent validation service |
| Reporting metadata for MiFlowCyt | Clone, catalogue and conjugate fields already structured on listings |
Why fit-for-purpose validation beats the generic checklist
The conventional advice on antibody validation treats it as a box-ticking exercise: run a titration, include an isotype control, cite a datasheet, move on. That approach produces data that looks rigorous and occasionally is not, because it applies the same shallow checklist to a pilot experiment and a publication-grade biomarker study alike.
What the evidence actually supports is proportionality. A knockout confirmed clone, titrated against your exact cells and instrument, with documented lot history, is worth more than five antibodies each validated to a superficial standard. Most labs have the resources to do this thoroughly for the two or three markers that actually anchor a study’s conclusions, and cannot realistically do it for every reagent in a twenty colour panel. Prioritise accordingly rather than spreading effort evenly.
The overlooked nuance is that sourcing and validation are not separate problems. An antibody with poor provenance, unclear lot history, or a manufacturer unwilling to share validation data will cost you more time in troubleshooting than it ever saved you at checkout. Start there, not with the titration bench.
— Veron
Source antibodies with the provenance already documented
Chasing down clone history, lot documentation and conjugate details after a reagent has already failed in your panel costs far more time than checking provenance before you buy. ABMIUM’s catalogue records that information on the product listing itself, so the metadata your MiFlowCyt reporting eventually needs is already structured rather than scattered across a vendor’s technical support emails.

Where a target lacks an obvious knockout control or the study’s stakes justify a documented third-party file, ABMIUM’s independent validation services can commission the specificity and titration work directly, giving you a validation record you did not have to generate entirely in-house. This suits labs mid-way through a panel build who need one or two markers validated to a defensible standard without pulling a technician off other work for a fortnight.
Browse a documented clone such as the anti-CD276 antibody 6A1, check the provenance recorded on the listing, and get a quote for independent validation if your target needs it before it goes anywhere near your panel.
Sources
- Current Protocols in Cytometry guidance (2023)
- IWGAV / antibody validation pillars (PMC)
- Relevance of antibody validation for flow cytometry (Kalina, 2020)
FAQ
How long are flow cytometry antibodies good for?
Most conjugated antibodies remain stable for 12 months from the manufacture date when stored at 2 to 8°C and protected from light, though tandem dyes degrade faster and should be re-titrated if stored longer than a few months or subjected to repeated freeze-thaw cycles.
How do you validate antibodies for flow cytometry?
Combine at least one genetic or independent-antibody specificity check with a full titration series and documented performance metrics, all run under the exact staining and instrument conditions of your final assay, following a fit-for-purpose approach matched to the study’s risk level.
What is the recommended antibody concentration for flow cytometry?
There is no universal concentration; the correct one is whatever sits at the plateau of your own stain index curve generated from an 8 to 12 point titration on your specific cells, buffer and instrument settings.
What is the difference between an isotype control and an FMO control?
An isotype control checks for nonspecific Fc-mediated binding using a matched irrelevant antibody, while a fluorescence minus one control accounts for spillover from every other fluorochrome in a multicolour panel and is the correct reference for gate placement.
Do I need to re-validate an antibody when the lot changes?
Yes. Lot-to-lot differences, particularly in tandem dye conjugates, can shift the optimal titre meaningfully, so re-titrating each new lot against a small positive and negative sample set is standard practice rather than an optional precaution.